Thursday, November 1, 2018

Daylight Savings Time

Daylight saving time 2018 in Texas began at 2:00 AM on
Sunday,
March 11
and ends at
2:00 AM on
Sunday,
November 4
All times are in Central Time.


Image result for daylights savings time clip art

I have never in my life had to adjust for Daylight Savings Time. I had to google it and find out more about it. So remember to adjust your clocks!

Monday, April 23, 2018

Free Pattern of the Week!

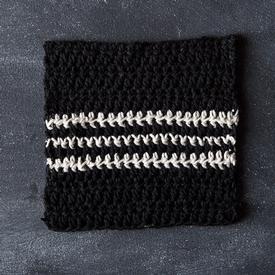
This weeks free pattern is Cookies and Cream Dishcloth from KnitPicks.
Cookies & Cream Crochet Dishcloth
Finished Measurements 6.5’ x 6.5’
Hook US I (5.5mm): crochet hook

 Much like the experience of eating a cookie, this dishcloth pattern is sweet, easy and addicting. Simple rows of half double crochet in alternating colors are worked up in a jiffy, leaving you plenty of time to finish that cookie snack. 

Directions With MC, Ch 27 (or any number of stitches +2) 

Row 1: Hdc in in 3rd ch from hook. 1hdc in every ch to end of row, turn. 

Row 2: Ch2 (does not count as st), 1hdc in every hdc to end of row, inserting the hook from front to back under both loops of each st – this looks like a “V,” turn. 

Repeat Row 2 until you have a total of 6 rows of MC. 

Row 7: Attach CC to the previous row, turn, ch 2. 1hdc in every hdc to end of row. 

Row 8: Attach MC to the previous row, turn, ch 2. 1hdc in every hdc to end of row. 

Row 9: Attach CC to the previous row, turn, ch 2. 1hdc in every hdc to end of row. 

Row 10: Attach MC to the previous row, turn, ch 2. 1hdc in every hdc to end of row. 

Row 11: Attach CC to the previous row, turn, ch 2. 1hdc in every hdc to end of row. 

Row 12: Attach MC to the previous row, turn, ch 2. 1hdc in every hdc to end of row. 

Row 13: Ch2, 1hdc in every hdc to end of row, Repeat Row 13 until you have 6 rows of MC. 

Finishing Fasten off last stitch, weave in ends.

The Original Pattern can be found at http://www.knitpicks.com/patterns/Cookies_Cream_Crochet_Dishcloth__D55595220.html

Monday, April 16, 2018

Free Pattern of the Week!

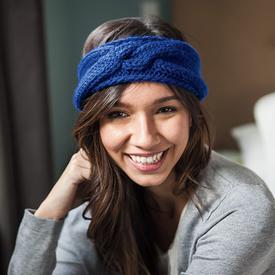
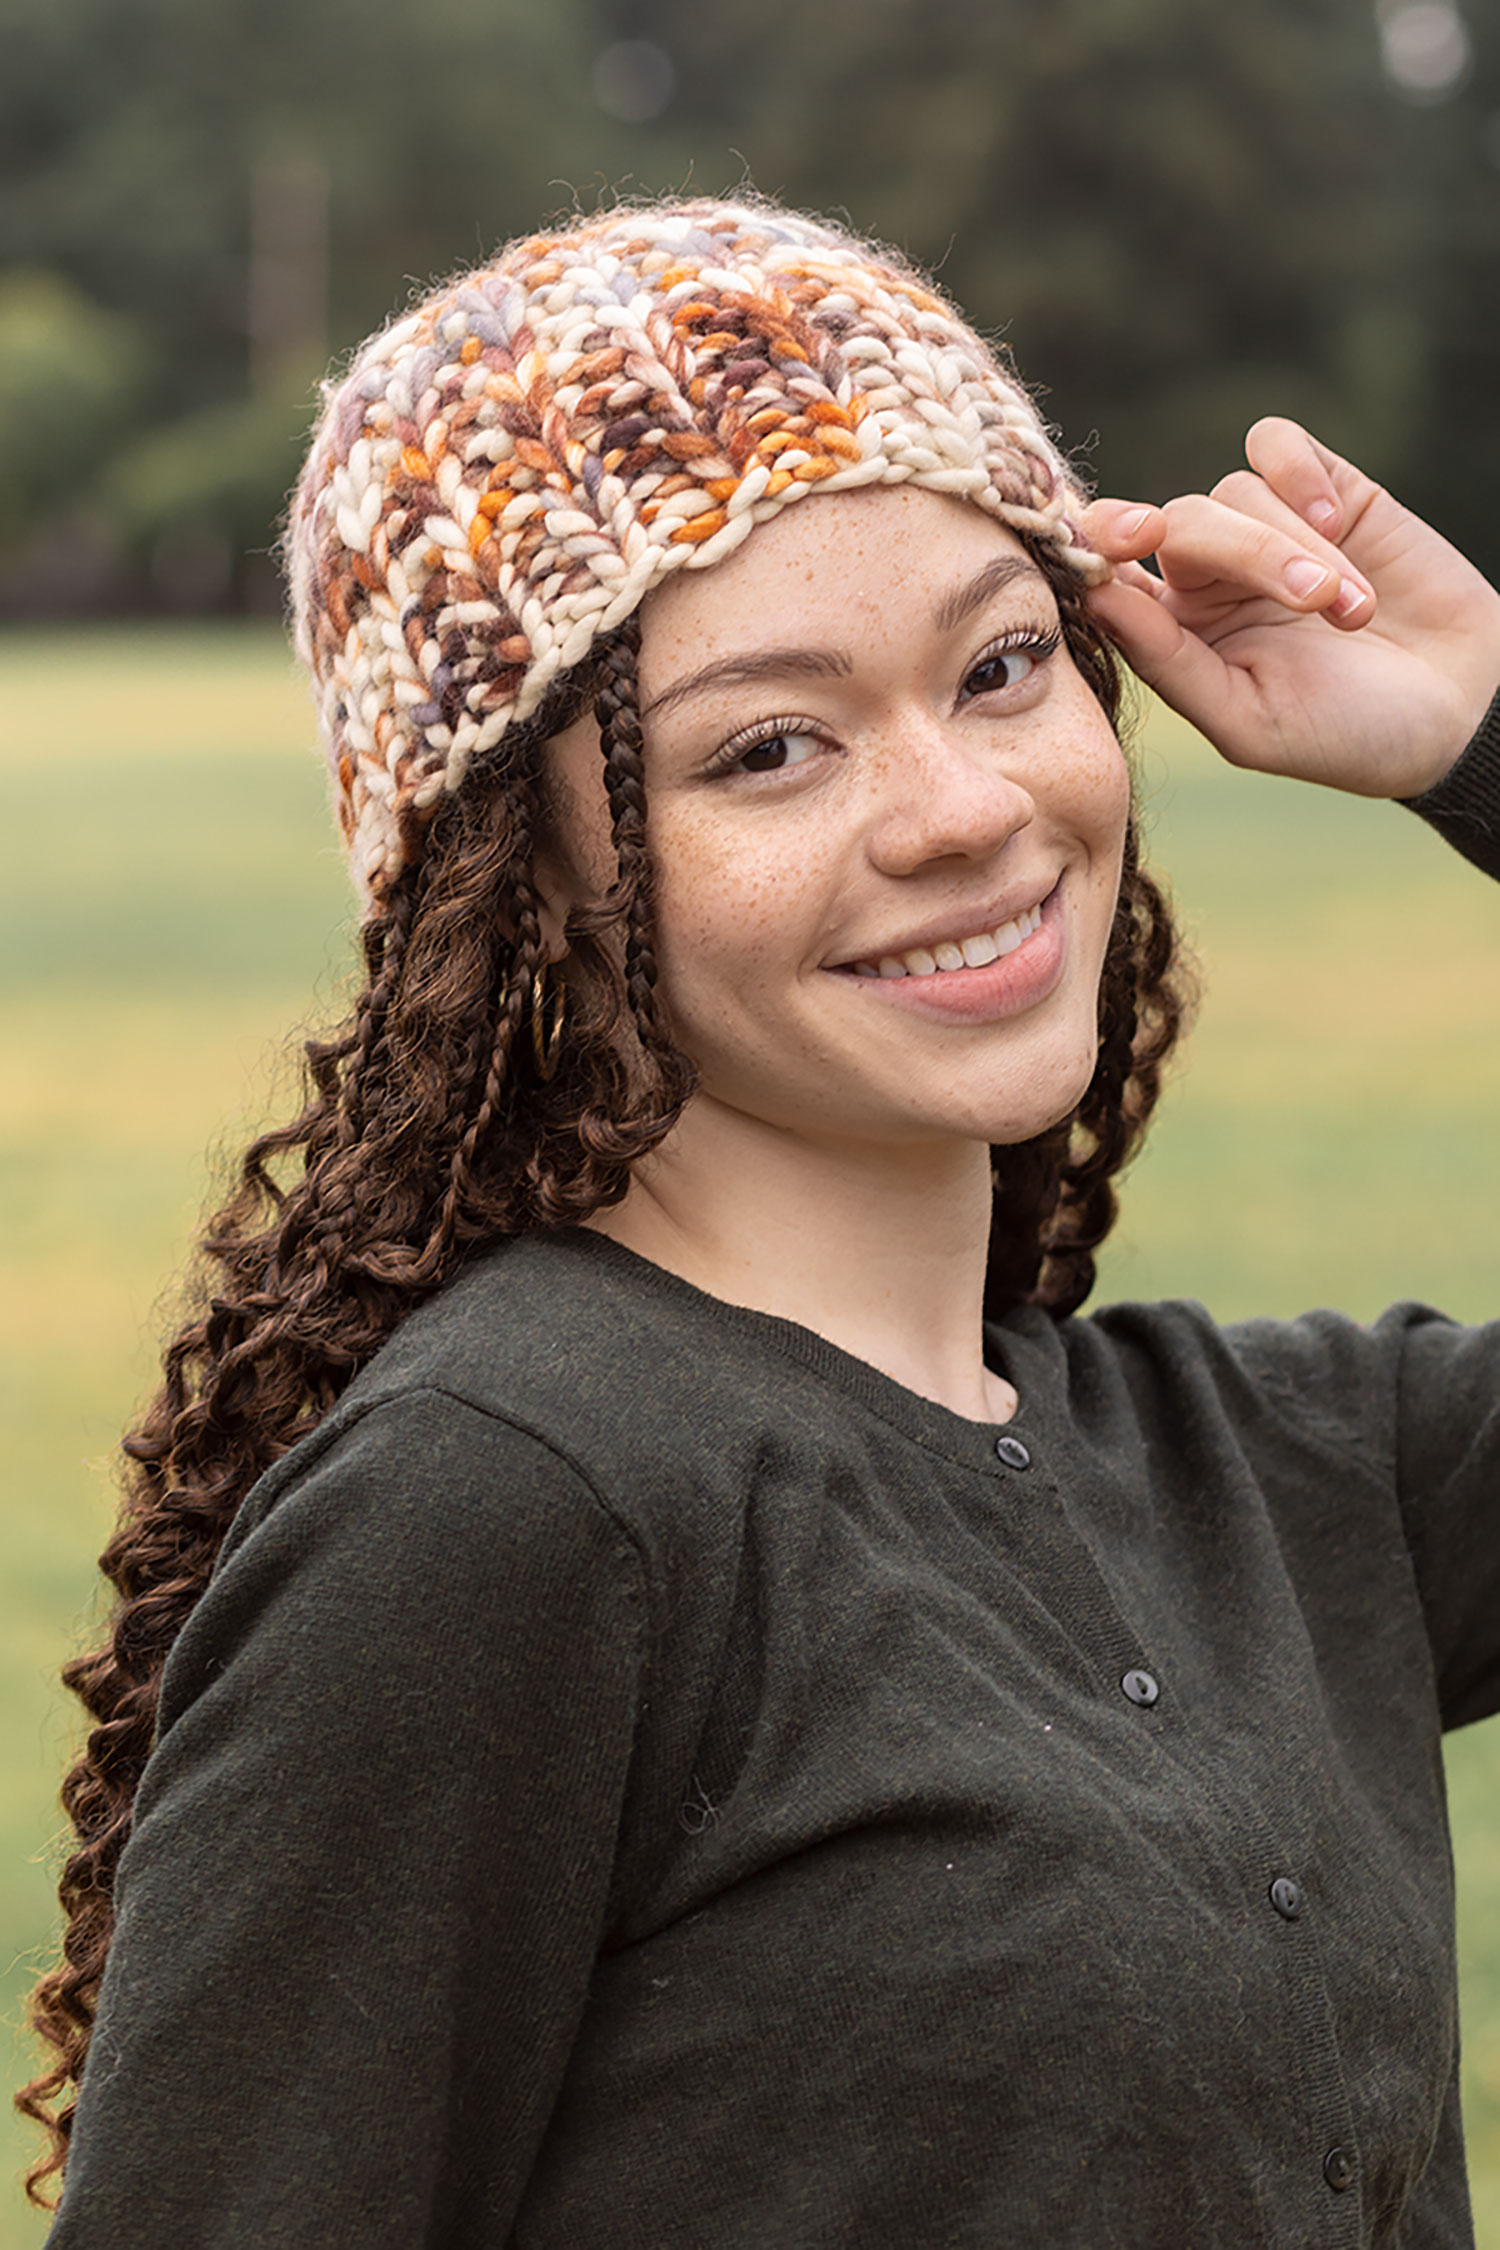
This weeks free pattern is Rosette Headband from KnitPicks.
Rosette Headband
Finished Measurements 21” circumference, 7” wide at widest point
 Needles US 10 (6mm) straight or circular needles,

This is a perfect project to practice your crocheted provisional cast on and grafting skills because of the small number of stitches. Never tried these techniques? This 2 hour headband is a low risk place to start. 

Headband is started with crocheted provisional cast on at center back. A bow-like cable is worked to hit the side of the wearer’s head off center, then the headband is knit to measure 21”. Provisional cast on is then pulled out and headband is grafted together to hide the seam. 

Rosette Stitch Pattern (worked flat over 21 sts) 
Row 1 (RS): Sl 1 Pwise, P3, K6, P1, K6, P4. 
Row 2 (WS): Sl 1 Kwise, K3, P6, K1, P6, K4. 
Repeat Rows 1 and 2 for pattern. 

Provisional Cast On (Crochet Chain Method) 
Using crochet hook and scrap yarn, make a slipknot and chain for 1”. Hold knitting needle in left hand. With yarn in back of the needle, work next chain st by pulling the yarn over the needle and through the chain st. Move yarn under and behind needle, and repeat for the number of sts required. Chain a few more sts off the needle, then break yarn and pull end through last chain. CO sts will be incorrectly mounted; knit into the back of these sts. To unravel (when sts need to be picked up), pull chain end out, and the chain should unravel, leaving live sts. 

Kitchener Stitch (Grafting) 
With an equal number of sts on two needles, hold needles parallel with WS’s facing in and both needles pointing to the right. Perform Step 2 on the first front st, and then Step 4 on the first back st, and then continue with instructions below. 
1: Pull yarn needle Kwise through front st and drop st from knitting needle. 
2: Pull yarn needle Pwise through next front st, leave st on knitting needle. 
3: Pull yarn needle Pwise through first back st and drop st from knitting needle.
4: Pull yarn needle Kwise through next back st, leave st on knitting needle. 
Repeat 1–4 until all sts have been grafted

Directions 
Using crocheted provisional cast on, CO 21 sts. 
Work in Rosette Stitch Pattern until headband measures 7.5”, ending with a WS row. 
Work eight Cable Rows as follows: 
Cable Row 1 (RS): Sl 1 Pwise, P3, Sl 6 sts to CN and hold to front, K6, P1, K6 from CN, P4. 
Cable Rows 2 and all WS Rows: Sl 1 Kwise, K3, P6, K1, P6, K4. 
Cable Rows 3 & 5: Sl 1 Pwise, P3, K6, P1, K6, P4. 
Cable Row 7: Repeat Cable Row 1. 
Cable Row 8: Sl 1 Kwise, K1, P6, K1, P6, K4 

Resume working Rosette Stitch Pattern with RS Row 1; continue in pat until piece measures 20.5” from CO, or .5” shorter than  head measurement. Do not bind off. Cut yarn, leaving a 24” tail. 

Finishing Pull out crocheted provisional cast on and place sts on 2nd needle. With yarn needle, graft ends together. Weave in ends. Block to smooth out cables.

The Original Pattern can be found at http://www.knitpicks.com/patterns/Rosette_Headband__D55671220.html

Monday, April 9, 2018

Free Pattern of the Week!

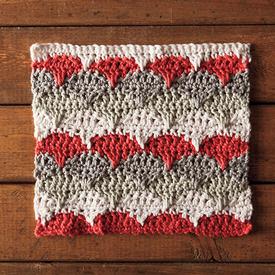
This weeks free pattern is Marguerite Dishcloth from KnitPicks.
Marguerite Crochet Dishcloth
Finished Measurements 9.5” x 8.5”
Hook US J (5mm): crochet hook

Clamshell Spike Stitch 
(Over 3 sl sts) 
Skip 1st sl st, 1 dc into sc under 2nd sl st, 1 dc into the sc of the row below that (3 rows down), 1 dc into sc under 2nd sl st again, skip 3rd sl st. 

Directions 

With Color A, ch 34 Setup rows 

Row 1: Sc in second ch from hook, then sc in each ch to end. Turn. 

Row 2: Ch 1. Sc in the first stitch, and then sc into each st along the row to end. Turn . 

Pattern repeat 

Row 3: Sl st in next 2 st, *hdc into the next st, dc in next 3 sts, hdc in next st, sl st in next 3 sts* rep from * to * to last 2 sts, sl st in last 2 sts. Turn. 

Attach Color B. 

Row 4: ch 3 (counts as dc), 1 dc into the next sl st, *hdc into hdc, sc in next 3 dc, hdc in hdc, work Clamshell Spike Stitch*, rep from * to * to last 2 last 2 sl sts, sc in each sl sts. Turn. 

Row 5: Ch 1, sc across entire row. Turn 

Row 6: Ch 3 (counts as dc). dc in next st, *hdc, sl st over next 3 st, hdc, dc in next 3 st* rep from * to * to last 2 sts, dc in last 2 sts. Turn. 

Attach Color C . 

Row 7: Ch 1, sc in same st, sc in next st *hdc in hdc, work Clamshell Spike Stitch, 1 hdc in hdc, 1 sc in next 3 dc* rep from * to * to last 2 sts, sc in last 2 sts. Turn. 

Row 8: Ch 1, sc across entire row. Turn. 

Row 9 Rep row 3 

Attach Color D 

Rows 10-12 Rep rows 4-6 

Attach Color A

Rows 13-15: Rep rows 7-9 

Repeat rows 3-15 once more, changing colors where indicated. 

Repeat rows 3-5 once more. 

Finishing Fasten off last stitch, weave in ends. Block if desired.


For more information, please see: http://sandra-cherryheart.blogspot.com/ 

The Original Pattern can be found at http://www.knitpicks.com/patterns/Marguerite_Crochet_Dishcloth__D55592220.html

Monday, April 2, 2018

Free Pattern of the Week!

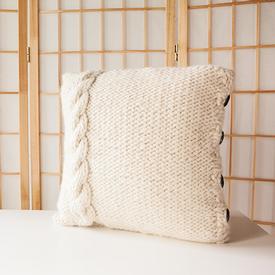
This weeks free pattern is Cable Me Cozy Pillow Cover from KnitPicks.
Cable Me Cozy Pillow Cover
Finished Measurements 16” Square
Needles US 13 (9mm) 32” or longer circular needles

This cozy pillow cover will dress up any room. The superbulky yarn knits up quick, making for a fun project or last-minute gift. The pillow cover is knit up in one piece. Then stitches are picked up on either side for the button band, the buttons are added, and the piece is folded and seamed. 

Right Leaning Cable 
(C3B) Slip 3 sts to CN, hold in back of work: K3, K3 from CN. 

Buttonhole Instructions
 Sl first st to right needle. Move yarn to front of work. Sl next st, psso, repeat twice. (3 sts bound off.) Sl the last st from right needle back to left needle. Turn, bringing yarn to front of work. CO 4 sts. Turn. Sl first stitch. Pass the extra cast on stitch over the next stitch, then slip this stitch back to left needle 

Directions
Pillow Cover Body 
The body of the pillow cover is knit in one piece. 
Loosely CO 66 sts. 
Row 1(WS): K38, P6, K22. 
Row 2 (RS): P22, K6, P38. 
Row 3: Repeat Row 1. 
Row 4: Repeat Row 2. 
Row 5: Repeat Row 1. 
Row 6: P22, C3B, P38. 
Repeat Rows 1-6 eight times then work Row 1, or until pillow cover measures 16.25”, ending with a WS row. BO loosely. 

Button Band 
With right side facing, PU and K 32 sts from left edge of pillow cover. 
Rows 1-5: *P2, K2, rep from * to end of row. 
BO all sts in rib pattern. 

Buttonhole Band 
With right side facing, PU and K 32 sts from left edge of pillow cover. 
Rows 1-2: *K2, P2, rep from * to end of row. 
Row 3: K2, P2, *work buttonhole over next 3 sts, then work 4 sts in rib pattern, rep from * 3 times, work 4th buttonhole, then K2, P2 over remaining 4 sts. 
Rows 4-5: Rep Rows 1-2. 
BO all sts in rib pattern. 

Finishing 
Weave in ends and block. Sew buttons onto button band to correspond with the buttonholes and button the ends together. With right sides facing, fold the pillow cover so that the button band and cable panel match up. Using the scrap yarn and mattress stitch, sew the edges together. Unbutton and flip pillow cover right side out. Insert pillow form and button.


The Original Pattern can be found at http://www.knitpicks.com/patterns/Cable_Me_Cozy_Pillow_Cover__D55718220.html#

Monday, March 26, 2018

Free Pattern of the Week!

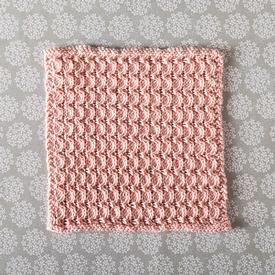
This weeks free pattern is Zig Zag Dishcloth from KnitPicks.
Zig Zag Dishcloth
Finished Measurements 10” Square
Needles US 7 (4.5mm) straight or circular needles


Zig Zag dishcloth is a fun and easy knit. The stitch pattern is easy to memorize, and the twisted stitches create a nubbly texture; wonderful for getting your dishes clean. It can easily be resized to fit your needs. Another option is to knit the cloth in a finer yarn on slightly larger needles to make an elegant face cloth. 

To resize, cast on a multiple of 3+4, and knit to desired length. 

It took exactly 50 grams to make one dishcloth, so if you were to cast on 46 sts (one less repeat of the stitch pattern), you should be able to get two dishcloths out of one ball. 

Crescent Stitch (worked flat) 
Row 1(RS): Knit 
Row 2 and all even rows: K2, purl to last 2 sts, K2 
Row 3: K2, *C3R, repeat from * until last 2 sts, K2 
Row 5: K2, *C3L, repeat from * until last 2 sts, K2 
Row 6: K2, Purl to last 2 sts, K2

Special Stitches 
C3R: Slip 2 sts to a cable needle and hold in back of work, K1, then K2 sts from the cable needle. 
C3L: Slip 1 st to a cable needle and hold in front of work, K2, then K1 from the cable needle. 

Directions 
CO 49 sts, using the Long Tail Cast-on. 
Knit 1 row. 
Work in Crescent Stitch until piece measures approx. 10”, or is square, ending with a Row 5. 
Knit 1 row (WS). BO in knit. 

Finishing Weave in ends, block if desired. 

The Original Pattern can be found at http://www.knitpicks.com/patterns/Zig_Zag_Dishcloth__D55820220.html

Monday, March 19, 2018

Free Pattern of the Week!

This weeks free pattern is The Big Cozy Hat from KnitPicks.
The Big Cozy Hat
FINISHED MEASUREMENTS 19” circumference, stretches to fi t up to a 23” circumference
NEEDLES US 15 (10mm) long circular needle for magic loop or two shorter circs US 17 (12mm) long circular needle for magic loop or two shorter circs

1X1 Rib in the Round All rounds: *K1, P1* rep to end of round 

pcdd Slip 1 stitch with yarn in back, p2tog, then pass slipped stitch over p2tog 

Directions 
Cast on 40 stitches with smaller needles and work the 1x1 Rib in the round for a total of five rounds. 

Change to larger needles and work the body of the hat in the slipped stitch broken rib pattern as follows: 
Round 1: knit 
Round 2: *Sl 1 with yarn in back, P1* to end of round 
Repeat Rounds 1 and 2 a total of four times or until hat measures approx. 4.5” from cast on edge. 

Crown 
Rnd 1: *K7, Pcdd* to end of round (4 times total) 
Rnd 2: *Sl 1 with yarn in back, P1* to end of round
Rnd 3: *K5, pcdd* to end of round (4 times total) 
Rnd 4: *Sl 1 with yarn in back, P1* to end of round Rnd 5: *K3, pcdd* to end of round (4 times total) 
Rnd 6: *Sl 1 with yarn in back, P1* to end of round Rnd 7: *K1, pcdd* to end of round (4 times total) 
Cut yarn leaving a 6-8” tail. 

Finishing With a yarn needle, thread the yarn tail through the remaining sts; tighten to finish. Weave in all ends.

The Original Pattern can be found at http://www.knitpicks.com/patterns/The_Big_Cozy_Hat__D55683220.html#

Saturday, March 17, 2018

Baby - 11 Fun Activities for Babies: 6 to 12 months


11 Fun Activities for Babies: 6 to 12 months
Help enhance your baby's growth with these development-boosting activities.
By Ellen Sturm Niz

Mom and baby clappingMom and baby clapping
CareyHope/Getty Images


Your baby may be halfway (or more!) through her first year of life, but she'll experience many more physical, mental, and social and emotional changes before that first birthday actually arrives. Not only is she more interested in the world around her, she'll soon be crawling, cruising, or walking around in it. There's no stopping her progress into toddlerhood, and with a little TLC, you can help her reach the next stage.

"Playing and connecting with our babies gets their brain development going," says Roni Cohen Leiderman, Ph.D., dean of the Mailman Segal Center for Human Development at Nova Southeastern University and co-author of Let's Play and Learn Together. "Our love, attention, time, and touch with our baby are the most important parts of developmental activities. Everything is underlined with parent-child interaction."

Wondering the best ways to encourage baby's growth? Dr. Leiderman and two other experts offer these simple but powerful development-boosting activities.

1. PEEKABOO
Materials needed: Small toys or books, blanket
What to do: Place a toy or book under a blanket, leaving part of the object showing. Then ask your baby, "Where is it?" and encourage him to look for it. "Babies will usually grab it and dig under the blanket," says Robert Myers, Ph.D., a child and adolescent psychologist, founder of the Child Development Institute, and assistant clinical professor of psychiatry and human behavior at the University of California, Irvine School of Medicine. "If yours doesn't, you could remove and then replace the blanket."
Variations: After your baby has mastered finding a partly hidden object, move on to hiding it completely under the blanket.
Skills learned: Fine motor skill development, object permanence

2. STACKING
Materials needed: Plastic measuring cups
What to do: Take turns stacking the cups and knocking them down. You can also have a "race," where you both stack cups at the same time.
Skills learned: Understanding cause and effect, fine motor skills

3. PUZZLES
Materials needed: Wooden puzzles
What to do: Around her first birthday, your baby will be ready for large wooden puzzles, Dr. Myers says. He suggests ones with colorful shapes or pictures. "Show and tell them first how it works—you may have to guide their hands," he says. "Clap and cheer when they are successful."
Skills learned: Problem solving, fine motor skills, visual skills

4. READING
Materials needed: Board or cloth picture books
What to do: Regularly read books to your baby, pointing to the pictures as you read and engaging her by changing your voice for different characters. Invite your little one to participate by encouraging her to laugh or act surprised by the story, touch the pictures, and turn the pages.
Skills learned: Language development, listening skills

5. CLAP WITH ME
What to do: Around 6 to 8 months of age, your child will learn to clap, Dr. Leiderman says, so encourage her with this rhyme:
Clap, clap, one, two, three
Clap, clap, clap with me.
Clap, clap, four and five.
Clap, clap, clap, bees in hive.
Clap, clap, six, seven, eight.
Clap, clap, clap, you are great.
Clap, clap, nine and ten.
Clap, clap, let's do it again.
Skills learned: Imitation, rhyming

6. RHYME TIME
What to do: Sing songs with real or made-up words that rhyme, like "thump, thump, thump, bump, bump, bump, jump, jump, jump." You might feel a little silly, but all that rhyming is another way to boost your baby's language development. "Like touch, talking with your baby is like food for their bodies and their minds," Dr. Leiderman explains. "A child's receptive understanding of language starts long before their expressive language, so we want to use as many opportunities as possible to drench them in language."
Skills learned: Develops auditory discrimination

7. SHAKE THE BOTTLE
Materials needed: Empty 16-ounce bottle, colored rice or pasta
What to do: Fill the bottle with the rice or pasta, and glue the top back on so your baby can safely watch and hear what happens as he shakes, rattles, and rolls the container. "A bottle doesn't usually make this noise," says Dr. Leiderman, "so now they are hearing new and novel things, which brings an element of surprise. Babies this age are also learning so much about cause and effect, which is an exciting new skill."
Skills learned: Fine motor skills, auditory discrimination, cause and effect

8. DISAPPEARING CHEERIO
Materials needed: Cheerios, opaque plastic cups
What to do: Create your own version of the old-fashioned shell game by hiding a Cheerio under a cup and seeing if your baby can find it. This simple activity reinforces object permanence, a major concept.
Variations: Using two different-colored cups, put the Cheerio under one cup and move it around to see if she can remember which one was the hiding place. After she has found the Cheerio under the first cup, show her you are now putting it under the second cup and see if she remembers that the Cheerio has moved.
Skills learned: Attention skills, memory development, object permanence

9. LIGHT SHOW
Materials needed: Colored plastic containers, mini flashlights
What to do: Turn on some mini flashlights, and drop them into empty water bottles, Tupperware, or any colored, lidded containers. Place your baby in tummy time in a dark room and let him explore the colorful lighted containers on the floor in front of him. "The harsh light of the LEDs will be diffused for little peepers, while any loose or removable parts will be safely away from baby's mouth," says Rachel Coley, an occupational therapist, author of Begin With a Blanket: Creative Play for Infants, and founder of CanDoKiddo.com. "Closely supervise as your little one grasps and turns, bangs and rolls the containers."
Variations: Take a flashlight out of a container, place your baby on her back and simply move the light slowly on a dark wall. "Pause on objects and talk to or with your child about what she's seeing," Coley adds.
Skills learned: Visual sensory stimulation, eye movement skills, sustained attention, socialization, bonding, body movement

10. BAGGY FINGERPAINTING
Materials needed: Washable finger paint, a gallon-size zippered freezer bag, tape
What to do: Squeeze a couple of dark colors of washable finger paint into a zippered baggy and seal tightly. Add duct tape for extra security. Spread the paint around to coat the inside of the bag, then place it on the floor in front of your baby during tummy time. Show him how to make marks on the outside of the bag with his hand or finger. "To preserve your little one's artwork, simply cut the edges off the bag and then peel off the top of the artwork, and lay flat to dry," Coley says.
Variations: Have an independent sitter? Try this activity in a high chair.
Skills learned: Sensory development, fine motor skills, understanding cause and effect, early writing skills

11. CONTAINER PLAY
Materials needed: Small toys, container
What to do: Place a few toys in a container with an opening a bit bigger than balls or pegs, plastic links, or other smaller items. Hand the container to your baby, who will probably turn it over and over, causing some toys to tumble out. "Eventually, your baby will realize that something is rattling around inside and that toys seem to be falling out of it, so she will start shaking, banging, and reaching inside the container," Coley says. Reload the container periodically until your kiddo figures out how to do it on her own.
Variations: Once she's gotten good at putting items in the container, you can extend the activity by choosing a narrow-mouthed container and longer toys, like rectangular blocks, pegs, and plastic spoons. "Your baby will learn through trial and error that she has to turn the objects to fit them into containers," she adds.
Skills learned: Object manipulation and orientation skills

I did not write this article. To see original article and others like it please visit https://www.parents.com/baby/development/growth/11-fun-activities-for-babies-6-to-12-months/

Wednesday, March 14, 2018

Baby Time Class - 1


Baby Time Class - #1

Opening Prayer -

Sign Language - Many signs incorporate letters into it. Therefor it is important to learn the letters first to better understand signs. This is not as important for children but this is a very essential step for adults. There are several resources for sign language out there, I love www.handspeak.com, www.babysignlanguage.com, http://hearmyhandsasl.blogspot.com, and https://kimyscorner.blogspot.com.


Image result for asl alphabet
Baby and Me Workout Time - https://www.parents.com/parenting/moms/healthy-mom/mommy-and-me-workout/

1. Rock and Roll - Targets abdominals
A. Sit on a mat or a carpet with knees bent and feet flexed
under a piece of heavy furniture. Place your baby in your lap facing you, his head and back resting against your thighs, and hold him securely.
B. Rock back a few inches until you feel your abdominals tighten. Hold the pose for ten seconds before slowly returning to starting position. Repeat ten times.

2. Have a Seat - Targets legs and buttocks
A. Stand with your heels about 12 inches from a wall,
holding your baby face out, with his back and head against your abdomen and chest.
B. Slowly bend your knees as if to sit, using the wall for support. Don't let knees extend past toes. Hold for ten seconds, then slowly stand up. Work up to ten reps.

3. Nursery-Rhyme Plank - Targets the core abdominal muscles, triceps, upper back, and buttocks
Start on hands and knees, with your baby on his back
below you. Lower your forearms to the floor so that your shoulders are directly above your elbows. Slide your knees back about 12 inches, keeping your back flat and your abs contracted. Hold the pose while you sing your baby's favorite nursery rhyme. Work up from 30 seconds to two minutes.

Music Time -
Maracas -  pair of hollow clublike gourd or gourd-shaped containers filled with beans, pebbles, or similar objects, shaken as a percussion instrument.

Introduce “Shaker Eggs” and play follow the leader.

Developmental Time - https://www.babycenter.com/0_lets-play-ready-steady-go-ups-and-downs_1498452.bc

Ups and Downs

Skills developed: Gross motor coordination
What you'll need: No equipment necessary

Lay your baby on their back, propped up slightly on a pillow. Sit facing them and grasp their hands firmly. Gently pull them to a sitting position, letting your baby’s head follow their shoulders, and enjoy their expression as they see the world from this new angle. Gently lower them and repeat as long as they are having fun.

As your baby gets used to this game, keep them sitting up a little longer and sing a chorus of "Row, Row, Row Your Boat," alternately pulling each of their arms in a rowing motion before lowering them back onto the pillow.

Remember: Each baby develops at a different pace, so if yours isn't quite ready for this activity, don't worry — just try it again in a few weeks. If they have surpassed this activity help them learn to touch their toes or go to the left and right

Story Time -
“Mighty Dads” - Brought by Kim, Read by ____________

Parent Chat Time -

Closing Prayer -

Tuesday, March 13, 2018

Missing Posts

Hello!

I has come to my attention that some of my post have gone away. I am working on fixing that right away. Please be patient as I get posts restored dating as far back as July 2017.

Thank You!

Monday, March 12, 2018

Free Pattern of the Week!

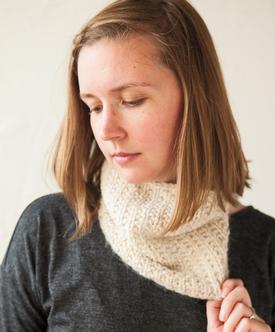
This weeks free pattern is Supa Fine Cowl from KnitPicks.
Supa Fine Cowl
Finished Measurements 18” x 9” unstretched and unblocked.
Needles US 8 - 5.0mm 16” circular

You’re one weekend away from a super luxurious knit cowl! This project is perfect for a beginning knitter who wants to practice their knit and purl stitches while catching up on the latest podcast episodes. The Supa Fine Cowl only requires one hank of our Super Fine Alpaca Special Reserve yarn or equivalent yardage of another bulky weight yarn making it perfect for stash busting or gift knitting. 
Directions 
CO 64 sts. 

Ribbing Place marker at the beginning of the round and join being careful to not twist your stitches. 
Row 1 (RS): (K1, P1) repeat to end. 
Row 2 (WS): K to end. 
Repeat rows 1-2 until piece measures 9” from cast on edge, ending after working a row 1. 

Finshing BO loosely, weave in ends and spray block lightly. 

The Original Pattern can be found at http://www.knitpicks.com/patterns/Supa_Fine_Cowl__D55723220.html

Saturday, March 10, 2018

Baby - The Stages of Sitting


The Stages of Sitting
Watching your baby gain independence is exciting. A major accomplishment every parent looks forward to is when she can sit on her own. Pediatrician Kurt Heyrman, M.D. says there are ways that you can help Baby gain these large motor skills and help her sit on her own. Here's how.
By Stacey Wilson
baby sitting

Before She Sits
Knowing what to look for and how to help your baby learn to sit on her own is important. Your baby might start sitting as early as 4 months old or as late as 9 months. Don't try to rush it. According to pediatrician, Dr. Kurt Heyrman, you should make sure she has some specific large motor skills such as she should be able to hold her neck up, have some balance, and have trunk muscles.

Getting Ready to Sit
From birth, your baby will have tummy time, where baby spends time playing on his belly which help strengthen your baby's neck, stomach, and back muscles. In general, babies' muscles strengthen from head to toe, so after his neck muscles gain strength, his upper back and lower back are next. You'll know those muscles are getting stronger when he begins lifting his head off the floor to look horizontally. To help Baby gain these large motor skills, change his position often. For example, shift him from his back to his tummy and from his crib to the floor. Dr. Heyrman's caution: "Make sure he is getting tummy time only when he is awake and when you are in the room to supervise him."

Tummy Time Troubles
At first, your baby might not like being on her stomach. But it's very important for her to have this time. It's how she'll gain those muscles needed for sitting and future milestones. You might try to ease into it by placing her on your chest with her tummy down and her face looking at you. Then you can try placing a C-shape pillow like a Boppy, under her armpits, supporting her chest and allowing her head to be a little farther from the ground.

Check Point
Once your baby can hold her head up on her own (usually around three to four months), you can sit her in a supportive chair like a Bumbo seat. Just be sure to always watch your baby while in the Bumbo seat or something similar. You can also use pillows to support your baby and help her sit up.
As Baby grows stronger, she will be able to sit for a few seconds when you place her in a sitting position. At first she'll be wobbly. She can hold her head up straight and balance a little but usually for only a few shaky seconds. Although she will tumble or topple often at this stage, she's learning. Practice makes perfect, so just be patient. "By 6 months," Dr. Heyrman says, "most babies should be able to sit for a second or two by themselves."

Building Balance
Babies need to learn balance before being able to sit alone. Although having good trunk muscles helps this, it's not all they need. Balance is neuromuscular, so before your baby will be able to sit, she'll need some specific brainpower. To help her gain this, you can place her in corners of chairs or couches so she can begin to feel what it's like to sit up. If you want to work together, sit on the floor with your legs crossed and let her sit between your calf and hamstring where she'll be safely supported.

The Tripod Sit
When a baby is learning to sit up, it's common to put out one or both arms to help stabilize the torso, essentially turning arms into a kickstand to hold up his body weight. This is the tripod sit. Until your baby has developed that strong core, he'll need a little help balancing when he's trying to sit alone. Be sure to keep Baby on something soft for these early weeks of sitting to help soften the fall when he tips. At around 4 months, Baby is also becoming more aware of what's going on around him. He might be distracted while sitting up and lose his balance. Make sure he is supervised or away from the edge of a chair or couch he could fall off of.

Products that Help
Strong neck, upper back, and lower back muscles are all needed to sit up alone. Along with propping him up with the support of pillows or leaning him against something soft, use child-size seats so Baby gets practice sitting up. ExerSaucer, Boppy pillows, Bumbo seats, and Jonny Jumps -- are a good way to encourage muscle growth.

What You Can Do
Put your baby on her back so you can slowly pull her up by her hands to a sitting position. Dr. Heyrman suggests the best way to learn: enticement. Baby loves looking at herself in mirrors already. Try placing one just a little too high for her to see into; this will encourage her to sit up. Another muscle-strengthening idea: Hold your baby under the arms so she can put her feet on the floor. Baby can't stand alone yet, but holding her in that position helps gain more core strength.

Be Prepared
Once your baby can sit alone, you'll need to make some adjustments to her room. By 6 months, her arms are very strong and she will be grabbing for everything. Check the crib's surroundings and put anything dangerous out of reach. For example, you'll want to remove mobiles so Baby doesn't get caught up in the mobile while pulling on them. Also, lower the crib's mattress so she won't be able to get out of the crib.

Cautions
Although your baby is strong enough to hold his head up and is now sitting on his own, he is not ready to face forward in the car. There is still a high risk of rapid deceleration injuries in the car, so keep him in a rear-facing carseat.

Up Next, Crawling!
After your baby has the ability to sit up, he will continue to gain strength in his lower body. He will gain enough strength to rotate his hips at the same time or shortly after he learns to sit. Not too long after sitting, Baby will be able to crawl
Copyright © 2010 Meredith Corporation.

I did not write this article. To find the original and others like it visit https://www.parents.com/baby/development/physical/stages-of-sitting/

Thursday, March 8, 2018

Daylight Savings Time!

Daylight saving time 2018 in Texas began at 2:00 AM on
Sunday
,
March 11
and ends at
2:00 AM on
Sunday
,
November 4
All times are in Central Time.


Image result for daylights savings time clip art

I have never in my life had to adjust for Daylight Savings Time. I had to google it and find out more about it. So remember to adjust your clocks!