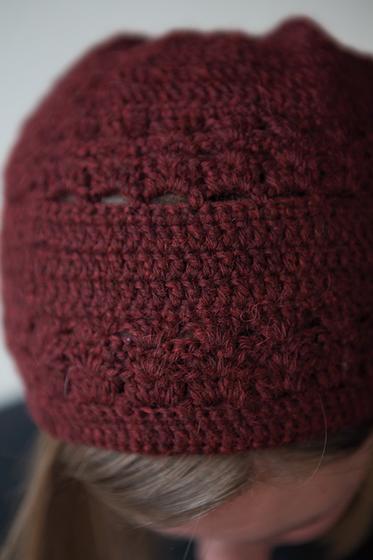
Finished Measurements 20.5 (22, 23.5)” finished brim circumference; hat is meant to be worn with 1” of negative ease. Depth is 8” for non-slouch version and 10.5” for slouch version.
Hooks US F/5 (3.75mm) for brim, US G/6 (4.00mm) for body
Directions for smaller size are shown first, followed by medium and large in parenthesis where different. The brim is crocheted first then the rest of the hat is crocheted upward to the crown; the brim is folded under and elastic may be added for a snug fit. Work a shorter depth for the non-slouch version or deeper for the slouch version.
SC INC (single crochet increase) Work 2 SC into same st.
DC DEC (double crochet decrease) Worked over 2 sts, YO, insert hook into 1st st, YO and pull up a loop, YO and pull through 2 loops on hook, YO, insert hook in 2nd st, YO and pull up a loop, YO and pull through 2 loops on hook, YO and pull through all 3 loops on hook.
4 DC-Shell Work 4 DC all in the same st.
3 DC-Cluster 3 DC all worked in same st: (YO, insert hook in space, YO and pull up a loop, YO and pull through 2 loops) 3 times, YO and pull through all 4 loops on hook.
Directions
Brim With smaller hook, Ch 110 (118, 126), or a multiple of 4 + 2 sts to fit around your head.
Row 1: SC in 2nd ch from hook and in each ch to end. (109 [117, 125] sc). Measure to ensure the chain fits desired head circumference
Row 2 (RS): Ch 3 (counts as 1st dc, now and throughout), turn. DC in 2nd sc and in each sc across row. Count your sts and write down the count so you can keep track. Join with a Sl St to 3rd ch of starting ch-3, being careful not to twist work. The rest of the hat is worked in rounds. Join the end of each row with a Sl St to the start stitch of the row, then turning to work back.
Row 3 (WS): Ch 1, turn. SC in 1st dc and in each dc across row. Join with a sl st to 1st sc of row (count your sts!). Place marker after Row 3 to indicate fold line for brim.
Row 4 (RS): Rep Row 2. Count your stitches! If you do not happen to have a multiple of 4 + 1 sts, in the next row work as many SC INC as needed (evenly spaced around row) to force a multiple of 4 + 1 sts.
Row 5 (WS): Rep Row 3 (SC INC as necessary to force a multiple of 4 + 1 sts). Join with Sl St to 1st sc of row.
Body
Change to larger hook for the rest of the hat.
Row 6 (RS): Ch 1, turn. SC in 1st sc, *Ch 4, Sk 3 sc, SC in next sc; rep from * across to end of row, join with Sl St to 1st sc. (27 [29, 31] ch-4 sp).
Row 7 (RS): Ch 3, do not turn. Work 4 DC-Shell in 1st ch-4 sp, *work 4 DC-Shell in next ch-4 sp; rep from * around, join with Sl St to 3rd ch of starting ch-3. (27 [29, 31] Shells).
Row 8 (WS): Ch 3, turn, Work 4 DC-Shell between 2nd and 3rd dc of 1st 4 dc-Shell, * work 4 DC-Shell between 2nd and 3rd dc of next 4 dc-Shell; rep from * around, join with Sl St to 3rd ch of starting ch-3.
Row 9 (RS): Rep Row 8.
Row 10 (WS): Ch 1, turn. SC in each dc around to tch, SC in 3rd ch of tch, join with Sl St to starting sc. (Mult of 4 + 1 sc, count them!)
Row 11 (RS): Ch 3, turn. SC in 2nd sc and in each sc across, join with Sl St to 3rd ch of starting ch-3. (Mult 4 + 1 dc).
Row 12 (RS): Ch 3, do not turn. Continue working with RS facing, DC in 2nd dc and in each dc around, join with Sl St to 3rd ch of starting ch-3. (Count and make sure you still have a mult of 4 + 1 dc).
Row 13 (RS): Rep Row 12.
Row 14 (WS): Ch 1, turn. SC in 1st dc and in each dc around to tch, SC in 3rd ch of tch, join with Sl St to starting sc. (Mult 4 + 1 sc).
For Non-Slouch Version only, work Rows 15-20 below: Rows 15-20: Repeat Rows 6-11 once, and then go to Crown Decreasing Section. The hat should be about 5.5” deep. The crown will add an additional 2.5”.
For Slouch Version only, work Rows 15-29 below: Rows 15-29: Repeat Rows 6-14 once, then Rows 6-11 once more. Go to Crown Decreasing Section. The hat should be about 8” deep. The crown will add an additional 2.5”.
Crown Decreasing
Next Row (RS): Ch 3, do not turn. *DC DEC over the next 2 dc, DC in each of the next 2 dc; rep from * around, join with Sl St to 3rd ch of starting ch-3. (82 [88, 94] dc. You have decreased approximately ¼ of your sts).
Next Row (RS): Rep Row 12.
Next Row (WS): Rep Row 14.
Next Row (RS): Ch 1, turn. SC in 1st sc, *Ch 2, Sk 2 sc, SC in next sc; rep from * to end of row, join with Sl St to 1st sc. (27 [29, 31] ch-2 sp).
Next Row (RS): Ch 3, do not turn. 3 DC-Cluster in 1st ch-sp, Ch 1, *3 DC-Cluster in next ch sp, Ch 1; rep from * around, join with Sl St to 3rd ch of starting ch-3. (27 [29, 31] Clusters).
Next Row (RS): Ch 3, do not turn. DC in top of 1st 3 DC-Cluster, *DC in top of next 3Dc-Cluster; rep from *, join with Sl St to 3rd ch of starting ch-3. (28 [30, 32] dc).
Next Row (RS): Ch 3, do not turn. *DC DEC over next 2 dc; rep from * to end of round, DC in rem st. Join with Sl St to 3rd ch of starting ch-3. (15 [16, 17] st).
Next Row (RS): Ch 3, do not turn. *DC DEC over next 2 dc; rep from * to end of round, DC in rem dc for size Md, join with Sl St to 3rd ch of starting ch-3. (8 [9, 9] st).
Cut yarn, leaving an 8” tail. Fasten off. Use a yarn needle to slip through top of all of the sts in last row; pull tight to close.
Finishing Brim First sew the ends of Rows 1 and 2 closed using either yarn or sewing thread. Try on hat to decide if you will be adding elastic to the brim. The elastic will keep the brim from stretching out after use, so I suggest it unless you prefer a loose fitting brim.
If using elastic, cut a piece about ¾” longer than desired length, then sew ends together, overlapping the extra ¾”. Turn hat inside out; fold up on marked fold line at the Row 3 of Brim. If using elastic, insert into fold. Using yarn or sewing thread on wrong side of hat, stitch unused loops of starting chain to Row 5 of Brim.
Remove marker. Weave in ends. Lightly steam block hat to increase floppiness. Enjoy!