Monday, January 30, 2017

Free Pattern of the Week!

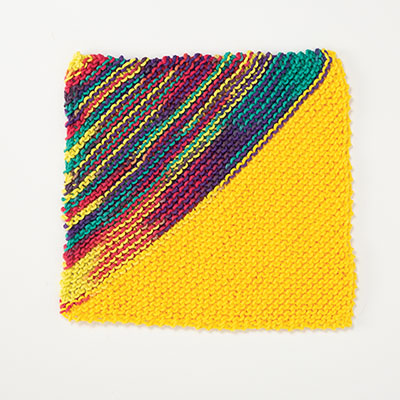
This weeks Free pattern is Slant Dishcloth from KnitPicks.Slant Dishcloth


Finished Measurements 10.5” square
Needles US 7 (4.5mm) straight or circular needles
Notions Yarn Needle
Gauge 18 sts x 16 rows = 4 inches garter stitch

Directions With MC, CO 1 stitch Set up rows
Row 1: kfb. (2 sts)
Rows 2: sl 1, kfb. (3 sts) Increase section
Row 3: Sl 1, k to last stitch, kfb.
Rows 4-63: Repeat Row 3 (64 sts) Decrease section
Row 64: attach CC , k all sts
Row 65: sl 1, k to last 2 stitches, k2tog Repeat row 65 until there are 2 sts left. k2tog, fasten off last st
Finishing Weave in ends, block if desired.

The Original Pattern can be found at
http://www.knitpicks.com/patterns/Slant_Dishcloth__D55552220.html

Thursday, January 26, 2017

Backcountry Travel in Winter

Backcountry Travel in Winter

Being an Outdoor Guide means that everyone asks you questions. Here are some tips and tricks that you can use!

Yearning to blaze your own trail across the snowy slopes that beckon from beyond the ski resorts? Backcountry travel is an increasingly popular way to explore new terrain.
This article gives a primer on the ways of enjoying winter adventures: telemark or randoneé skiing, snowshoeing, and snowboarding or splitboarding.
Understanding the Risks
In the backcountry, there's no lodge, no bar—and no lift line. You're skiing in an uncontrolled environment, whether it's out-of-bounds of a ski area, or in the wilderness. (Not sure where those boundaries lie? Do your homework before you go to make sure you're in compliance with local land-use restrictions.)
There's no ski patrol out there, either. In the backcountry, it's just you and your buddies, testing your know-how against nature. All the preparation, safety considerations and navigational planning for a day in the snow are up to you, so take these tasks seriously.
Topping the list of safety concerns is avalanches. These pose a very real and lethal danger to backcountry travelers. Before venturing out, it's essential that you get the education and skills to recognize—and avoid—these killers.
To get started, read the REI Expert Advice series of articles starting with Avalanche Basics, then seek training from avalanche experts. Your local REI store may offer such clinics during the winter season.
Backcountry Travel Methods
There are 4 primary modes of winter backcountry travel. Each skiing or boarding style equips you to ascend a slope under your own power and enjoy the thrill of the downhill as you rip your descent. Snowshoeing is a great complementary activity or offers easy-to-learn fun in its own right.
Telemark Skiing

"Free-heeled" telemark ski bindings allow your feet and ankles to flex free of the skis, whether you're climbing with skins (discussed below) or descending the steep terrain of the backcountry. Named for the Telemark region of Norway where it was developed, "tele skiing" is a challenging style that combines striding with a bent-knee technique for carving downhill turns.
Why do it?
  • It's fun: Telemark combines an element of "downhill thrill" with the go-anywhere flavor of free-heel skiing.
  • It's unique: Telemark is a cross-country style all its own. It can be a refreshing change of pace for skiers of all ability levels.
Randoneé Skiing
Also referred to as alpine touring (AT) and ski mountaineering, randoneé (which means "excursion" in French) has spiked in popularity in recent years. Randoneé ski gear combines the distinctive features of cross-country and alpine skis. The bindings convert from free-heeled (for touring and climbing) to a locked-down position for downhill runs. No need to learn a new turning technique—with randoneé gear, you can descend backcountry slopes with the same type of turns you learned at the downhill resort.
Why do it?
  • It's exciting: Randonneé skiing opens up an entirely new world of adventure to downhill skiers.
  • See more scenery: This style lets you cover more terrain than you can with snowshoes, and you can climb with greater efficiency than you can with telemark skis.
Snowshoeing
By itself, snowshoeing makes for an enjoyable backcountry outing, one that is especially suited to rolling terrain. The leader breaks the trail, making it an easier activity to do as a group.
Snowshoeing can also be part of a 2-step approach to backcountry travel. In this scenario, you put a board on your pack and strap on snowshoes to make an ascent. Snowshoe heel lifters (on some models) make climbing steep slopes easier. At the summit, simply swap gear to float gleefully down the powder.
Why do it?
  • It's easy: Snowshoeing is a fun, simple-to-learn winter sport. As the saying goes: "If you can walk, you can snowshoe."
  • Snowshoes are small, light and easy to pack. Plus, most snowboard boots or hiking boots will work just fine with snowshoes.
  • Versatility: You can snowshoe many trails that you can't ski due to trees or low-snow conditions.

Snowboards and Splitboards
As noted above, traditional snowboards can be paired with snowshoes to hike up the slopes and then ride back down.
An increasingly popular alternative are splitboards. These are modified snowboards that split into 2 free-heeled skis for a backcountry approach that bypasses the lifts. With skins (discussed below) on the bottom, they climb much like skis. Once you've reached your destination, simply reassemble the board and surf the power all the way back down. Sweet!
Why do it?
  • They're great in powder: The high flotation and single edge of a snowboard are arguably your best choice in powder conditions.
  • Splitboards are versatile: They have special, movable bindings that allow you to easily tour alongside your telemark and randoneé/alpine touring (AT) buddies.
What to Bring
Buddies: Traveling alone in the winter backcountry is a high-risk endeavor. Don't do it solo.
Climbing skins: Whether you travel the backcountry by ski or by splitboard, skins are a crucial piece of gear. Like a piece of carpeting, skins temporarily stick to the underside of a ski (or board) to provide the traction that greatly aids your climb up the backcountry slopes. See the REI Expert Advice article, Climbing Skins and Accessories, for details.
Avalanche safety gear: The must-have gear for each and every backcountry explorer in your group is an avalanche transceiver, snow shovel and probe. Equally important is knowing how to use this gear—practice before you go! Also consider the innovative safety gear options of avalanche airbags or Avalung packs. For details, see the REI Expert Advice article, Avalanche Safety Gear.
Proper clothing: Layering is the key to comfort when you're exerting in winter conditions. For details, see the REI Expert Advice article, Layering Basics.
The Ten Essentials: For a day in the backcountry, you need to carry—and know how to use—the Ten Essentials. This time-honored list of emergency and safety gear has evolved into the Ten Essentials systems. For details, see the REI Expert Advice article, The Ten Essentials.
Repair gear: Bring items that can help you repair your gear in the field. A few basics: screwdrivers, pliers, duct tape, bailing wire and rub-on ski wax.
Once armed with safety and navigational skills and outfitted with the proper gear, you're all set to explore the wide open spaces of the backcountry. Be safe, and have fun!

Article and others like it found at REI.com
Monday, January 23, 2017

Free Pattern of the Week!

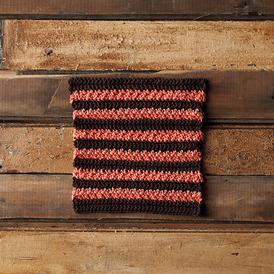
This weeks Free pattern is Ribbon Candy Dishcloth from KnitPicks.Ribbon Candy Crocheted Dishcloth


Finished Measurements 9” square
Needles G/6 (4.25mm) crochet hook
Notions Yarn Needle
Gauge 15 sts x 15 rows = 4 inches

Notes: When changing colors, on the final stitch, when drawing through the last two loops, use the new yarn color. Then ch 1. This creates a cleaner change over.

Directions With MC, ch 35
Row1: Sc in 2nd chain from hook, sc in each chain. Ch1, turn (34 sc).
Rows 2 -3: Sc across. Ch1, turn.
Row 4: sc across. Change to CC, Ch1, turn. Ribbon stitch
Row5: * 1 sc, in next st, 1 dc. In next st. * repeat across ending with a dc. Ch1. Turn.
Row 6 *In the back loop only, 1 sc, in next st, 1 dc. In next st. * repeat across. Change to MC, Ch1, turn.
Row 7-8: Repeat Row 2.
Row 9: Repeat Row 4.
Repeat Rows 5 – 9 four more times. Repeat Rows 5-6. Repeat Row 2 four times. Fasten off. Finishing Weave in ends,

The Original Pattern can be found at
www.knitpicks.com

Thursday, January 19, 2017

Penny Pincher - Rejuvenating SecondHand Toys


You might be a parents looking to fill the toy box on a tight budget. The following are ideas on how to save money and be more environmentally aware. 

 - Toys with stickers tend to show their wear as they become ripped or soiled. Old stickers can be removed with rubber cement thinner or nail polish remover
 - Wash toys in warm water with soap. Use a small bristle brush like a tooth brush.
 - You can use sand paper or a nail file to scrap away rough spots.
 - Metal toys can be sanded and repainted. This works for bikes, wagons, and trucks. 


Hopefully these tips can help you fix up older toys and make your little one happy! 


Monday, January 16, 2017

Free Pattern of the Week!

This weeks Free pattern is Ice Crystal Face Cloth from KnitPicks.Ice Crystal Face Cloth


Finished Measurements 9.5” wide x 11” high
Needles US 6 (4.0mm) straight or circular needles, or size to obtain gauge
Notions Yarn Needle
Gauge 22 sts and 26 rows = 4” stockinette stitch

Notes: This washcloth features stranded color work. The cloth is fully charted with a stockinette color work center surrounded by a solid color garter stitch edge.

Directions

CO 51 stitches using long tail cast on using main color (MC).
Knit five rows in main color.

Work Chart

Odd rows: k5 MC, k sts as indicated on chart, k5 MC.

Even rows: k5 MC, p sts as indicated on chart, k5 MC.

After completing chart, knit five rows in main color.

Finishing Weave in ends, wash and block to size.


The Original Pattern can be found at
http://www.knitpicks.com/patterns/Ice_Crystal_Face_Cloth__D55801220.html

Thursday, January 12, 2017

Winter Camping Checklist

Winter Camping Checklist

Being an Outdoor Guide means that everyone asks you questions. Here are some tips and tricks that you can use!


The Ten Essentials

For safety, survival and basic comfort:

1. Navigation

  • Map (with protective case)
  • Compass
  • GPS (optional)

2. Sun protection

  • Sunscreen
  • Lip balm
  • Sunglasses

3. Insulation

  • Jacket, vest, pants, gloves, hat (see Clothing)

4. Illumination

  • Headlamp or flashlight (plus spare)
  • Extra batteries

5. First-aid supplies

  • First-aid kit

6. Fire

  • Matches or lighter
  • Waterproof container
  • Fire starter (for emergency survival fire)

7. Repair kit and tools

  • Knife or multi-tool
  • Kits for stove, mattress; duct tape strips

8. Nutrition

  • Extra day's supply of food

9. Hydration

  • Water bottles or hydration system (insulated)
  • Water filter or other treatment system

10. Emergency shelter

  • Tent, tarp, bivy or reflective blanket

Beyond the Ten Essentials

  • Backpack
  • Daypack or summit pack
  • 4-season tent or tarp or bivy sack
  • Snow or tent stakes and guylines
  • Tent-pole repair sleeve
  • Footprint (if needed for tent)
  • Sleeping bag (liner optional)
  • Stuff sack or compression sack
  • 2 sleeping pads per person (+ optional chair kit)
  • Pillow or stuffable pillowcase
  • Packable lantern
  • Snowshoes
  • Skis (with skins)
  • Crampons
  • Ice axe
  • Trekking poles (with snow baskets)
  • Multifunction watch with altimeter
  • Signaling mirror (often on compass)
  • Whistle
  • Personal locator beacon (PLB)
  • Avalanche transceiver (1 per person)
  • Avalanche probe (1 per person)
  • Snow shovel (1 per person)
  • Energy beverages or drink mixes
  • Slope meter
  • Snow saw
  • Meals
  • Energy food (bars, gels, chews, trail mix)
  • Stove
  • Fuel
  • Cookset with large pot (for melting snow)
  • Dishes or bowls
  • Utensils
  • Cups (measuring cups)
  • Pot grabber
  • Food-storage sacks or canister
  • 50' nylon cord
  • Backup water treatment (e.g., halogens)

Clothing

  • Base layer: wicking underwear
  • Mid layer: insulating jacket/vest/pants
  • Shell: rain jacket (or soft-shell jacket)
  • Rain pants (or soft-shell pants)
  • Dry clothing for camp
  • Insulating hat, cap or headband
  • Balaclava and/or face mask
  • Goggles
  • Gloves and/or mittens
  • Waterproof overmitts

Footwear; Assorted Personal Items

  • Boots
  • Main socks, liner socks, spare socks
  • Gaiters
  • Camp booties
  • Bandana or Buff
  • Hand warmers
  • Toilet paper + sanitation trowel
  • Hand sanitizer + quick-dry towel
  • Toothbrush and/or toiletry kit
  • Notebook and pen or pencil
  • Permits
  • Guidebook; interpretive field guide(s)
  • Camera
  • Binoculars
  • Two-way radios
  • Cell or satellite phone
  • Music player with headphones
  • Small amount of cash or credit card
  • Trip itinerary left with friend + under car seat

Article and others like it found at REI.com

Monday, January 9, 2017

Free Pattern of the Week!

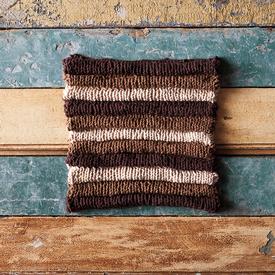
This week's free pattern is the Triple Chocolate Dishcloth from KnitPicks.comTriple Chocolate Dishcloth


Finished Measurements - 8.5” x 9” blocked
Needles - US 7 (4.50mm) straight or circular needles, or size to obtain gauge; US 6 (4.00mm): circular needles (for final row & bind off)
Notions - Yarn Needle, Stitch Markers
Gauge - 13.5 sts in stockinette and 4.5 pleats = 4”


Notes
The texture of this dishcloth is unique and fun! A great project to practice a slip stitch technique. The bind off is a unique slip stitch bind off and is important to use circular needles for this technique. Pattern adapted from 400 Knitting Stitches by Potter Craft.

Directions

With A and larger needles. CO 51 sts

Set rows

Row 1 (RS): K1, *k1,p1*; repeat from * to * to last 2 st. K2.

Row 2: K1, *p1,k1*; repeat from * to * to last st. K1.

Pleat Rows

Rows 3, 5, 7, 9: K1, *k1, slip 1 purlwise (yarn in front); * repeat from * to * to last 2 stitches. K2.

Rows 4, 6, 7, 10: K1, *p1, slip 1 purlwise (yarn in back); repeat from * to * to last stitch. K1.

Repeat these 10 rows (10) times

After each row 10 is finished, change color and begin with Row 1.

Stripe color order: A, B, C, A, B, C ,B, A, C, B, A

Last row: Change to smaller needles, knit across. Slide stitches back to other end of the circular needle (so the working yarn is at the end of the row.)

Bind off
For a good snug bind off do a slip st without knitting: Slip the first two sts to the right needle. Slip first st over the 2nd st and slip off the needle, one st left on right needle. *Slip next st from left needle to right needle, slip 1st st over the last st and off the needle. *Repeat across. Tie off the last st with working yarn.

Finishing
Weave in ends and block if desired


The original patter can be found at http://www.knitpicks.com/patterns/Triple_Chocolate_Dishcloth__D55559220.html

Thursday, January 5, 2017

How to Accomplish Your New Year's Resolutions

How to Accomplish Your New Year's Resolutions

New Year’s resolutions are goals or promises that people make for the New Year holiday to try to make their upcoming year better. Many find it difficult to maintain & accomplish their resolutions. Here is a list of things you can do to help make sure you accomplish the goals you set for the New Year.


1.      Brainstorm about changes & improvements you'd like to make. These can be about anything, not just the big ones like quitting smoking & losing weight that many people associate with New Year's resolutions. Jot down some notes while doing the following:
·         Consider how you can improve your health, your relationships with others, your work life, and your work life.
2.      Choose one or two attainable larger goals. Look over your notes & determine what items on it are most important to you.
3.      Create “systems.” Systems are the ways that you carry out a larger goal. You need to break down large goals into smaller actions that can are easier to carry out. If you leave your larger goals too vague, you may get confused & change your mind frequently on the ways to accomplish them.
4.      Talk to others about your goals. Discuss your goals & why you made them with your family & friends.
·         Ask for others’ support on these goals throughout the year. If possible, team up & visit the gym or ask them to speak up if you slip.
·         People who tell others about their goals are more likely to accomplish them, because they have extra support they need, or because they’re afraid of being embarrassed if they don’t accomplish them.
5.      Create a schedule. Even more important than a specific deadline for your goals is to set a schedule of how you will reach the goal
6.      Start following your plan immediately. Don't wait for inspiration to strike. The best thing to do is start on January 1st & start tracking your progress.
·         If your goal is to lose weight, don’t say, “I’ll start tomorrow.” Start right away!
7.      Create accountability. Find someone who has the same resolution. If you have a friend who’s also trying to lose weight, check in with each other & motivate each other.
8.      Remind yourself about your goals. For every day on your calendar or schedule, write down what you will do for that day, what time you will do it, & don't forget to actually do it, no matter how busy you are
9.      Create your environment so that you will accomplish your goals. It’s also good to get rid of habits that don’t coincide with your goals & may contribute to you being unable to reach them

·         For example, set your running shoes next to the door. Put fruits & veggies in the front of the fridge. Get rid of the junk food & don’t buy more.

Monday, January 2, 2017

Free Pattern of the Week!

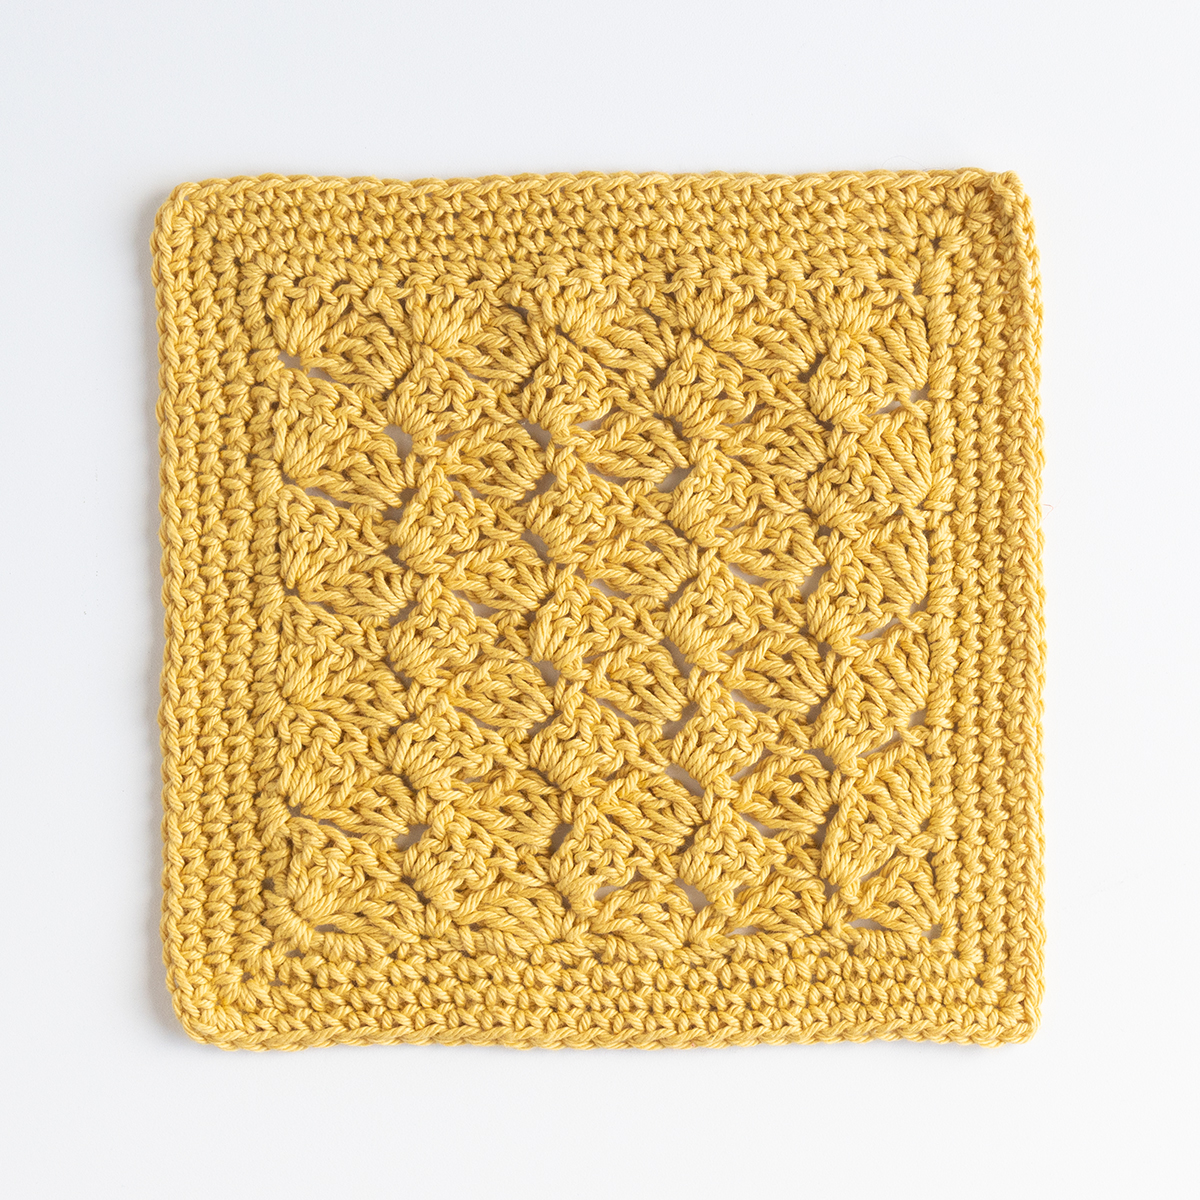
This week's free pattern is a Custard Pie Dishcloth by KnitPicks.com.Custard Pie Crochet Dishcloth


Finished Measurements - 8.25’ x 8.25’”
Hook - US J (6mm): crochet hook
Notions - Yarn Needle
Gauge - 4 shells = 4” (gauge is not critical)

Notes: This easy shell stitch center creates a delectable, textured effect, snugly framed by a chunky single crochet border.

Directions

Ch 22 (or a multiple of 3+1)

Row 1: 3 double crochet in 4th stitch from hook. Skip next 3 stitches, single crochet in 4th stitch. *Chain 3. Make three 3 double crochet in that same single crochet stitch. Skip the next 3 stitches, single crochet in the next stitch. Repeat from * to the end of the row. End with a single crochet.

Row 2:
Chain 3 and turn. Make 3 double crochet in the single crochet of the previous row. Single crochet in the next chain 3 space (You’ll find it on the opposite side of the next double crochet cluster of the previous row) *Chain 3, make 3 double crochet in the same chain 3 space. Single crochet in the next chain 3 space. Repeat from * across the row. End with a single crochet in the last chain 3 space.

Repeat Row 2 7 times or until the desired size of your dishcloth!

Final row: Turn, chain 2. *3 double crochets in the single crochet stitch from previous row (same stitch you just chained up from). Single crochet in the next chain 3 space. 3 double crochet in the hole connecting the 3 chain that you just single crocheted into and the previous cluster of double crochets. Continue from * until you end with a single crochet.

Border
Turn, chain 1. Single crochet evenly around the border, making sure to do 2 single crochets in each corner. Repeat for 3 rows or until desired size of border.

Finishing
Fasten off last stitch, weave in ends. beg beginning, blp single or double crochet in back, loop only, bpdc back post double crochet


The original pattern can be found at http://www.knitpicks.com/patterns/Custard_Pie_Crochet_Dishcloth__D55588220.html