Monday, April 23, 2018

Free Pattern of the Week!

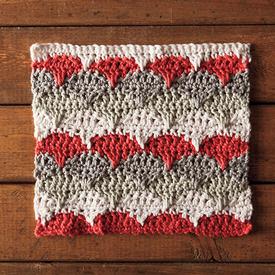
This weeks free pattern is Cookies and Cream Dishcloth from KnitPicks.
Cookies & Cream Crochet Dishcloth
Finished Measurements 6.5’ x 6.5’
Hook US I (5.5mm): crochet hook

 Much like the experience of eating a cookie, this dishcloth pattern is sweet, easy and addicting. Simple rows of half double crochet in alternating colors are worked up in a jiffy, leaving you plenty of time to finish that cookie snack. 

Directions With MC, Ch 27 (or any number of stitches +2) 

Row 1: Hdc in in 3rd ch from hook. 1hdc in every ch to end of row, turn. 

Row 2: Ch2 (does not count as st), 1hdc in every hdc to end of row, inserting the hook from front to back under both loops of each st – this looks like a “V,” turn. 

Repeat Row 2 until you have a total of 6 rows of MC. 

Row 7: Attach CC to the previous row, turn, ch 2. 1hdc in every hdc to end of row. 

Row 8: Attach MC to the previous row, turn, ch 2. 1hdc in every hdc to end of row. 

Row 9: Attach CC to the previous row, turn, ch 2. 1hdc in every hdc to end of row. 

Row 10: Attach MC to the previous row, turn, ch 2. 1hdc in every hdc to end of row. 

Row 11: Attach CC to the previous row, turn, ch 2. 1hdc in every hdc to end of row. 

Row 12: Attach MC to the previous row, turn, ch 2. 1hdc in every hdc to end of row. 

Row 13: Ch2, 1hdc in every hdc to end of row, Repeat Row 13 until you have 6 rows of MC. 

Finishing Fasten off last stitch, weave in ends.

The Original Pattern can be found at http://www.knitpicks.com/patterns/Cookies_Cream_Crochet_Dishcloth__D55595220.html

Monday, April 16, 2018

Free Pattern of the Week!

This weeks free pattern is Rosette Headband from KnitPicks.
Rosette Headband
Finished Measurements 21” circumference, 7” wide at widest point
 Needles US 10 (6mm) straight or circular needles,

This is a perfect project to practice your crocheted provisional cast on and grafting skills because of the small number of stitches. Never tried these techniques? This 2 hour headband is a low risk place to start. 

Headband is started with crocheted provisional cast on at center back. A bow-like cable is worked to hit the side of the wearer’s head off center, then the headband is knit to measure 21”. Provisional cast on is then pulled out and headband is grafted together to hide the seam. 

Rosette Stitch Pattern (worked flat over 21 sts) 
Row 1 (RS): Sl 1 Pwise, P3, K6, P1, K6, P4. 
Row 2 (WS): Sl 1 Kwise, K3, P6, K1, P6, K4. 
Repeat Rows 1 and 2 for pattern. 

Provisional Cast On (Crochet Chain Method) 
Using crochet hook and scrap yarn, make a slipknot and chain for 1”. Hold knitting needle in left hand. With yarn in back of the needle, work next chain st by pulling the yarn over the needle and through the chain st. Move yarn under and behind needle, and repeat for the number of sts required. Chain a few more sts off the needle, then break yarn and pull end through last chain. CO sts will be incorrectly mounted; knit into the back of these sts. To unravel (when sts need to be picked up), pull chain end out, and the chain should unravel, leaving live sts. 

Kitchener Stitch (Grafting) 
With an equal number of sts on two needles, hold needles parallel with WS’s facing in and both needles pointing to the right. Perform Step 2 on the first front st, and then Step 4 on the first back st, and then continue with instructions below. 
1: Pull yarn needle Kwise through front st and drop st from knitting needle. 
2: Pull yarn needle Pwise through next front st, leave st on knitting needle. 
3: Pull yarn needle Pwise through first back st and drop st from knitting needle.
4: Pull yarn needle Kwise through next back st, leave st on knitting needle. 
Repeat 1–4 until all sts have been grafted

Directions 
Using crocheted provisional cast on, CO 21 sts. 
Work in Rosette Stitch Pattern until headband measures 7.5”, ending with a WS row. 
Work eight Cable Rows as follows: 
Cable Row 1 (RS): Sl 1 Pwise, P3, Sl 6 sts to CN and hold to front, K6, P1, K6 from CN, P4. 
Cable Rows 2 and all WS Rows: Sl 1 Kwise, K3, P6, K1, P6, K4. 
Cable Rows 3 & 5: Sl 1 Pwise, P3, K6, P1, K6, P4. 
Cable Row 7: Repeat Cable Row 1. 
Cable Row 8: Sl 1 Kwise, K1, P6, K1, P6, K4 

Resume working Rosette Stitch Pattern with RS Row 1; continue in pat until piece measures 20.5” from CO, or .5” shorter than  head measurement. Do not bind off. Cut yarn, leaving a 24” tail. 

Finishing Pull out crocheted provisional cast on and place sts on 2nd needle. With yarn needle, graft ends together. Weave in ends. Block to smooth out cables.

The Original Pattern can be found at http://www.knitpicks.com/patterns/Rosette_Headband__D55671220.html

Monday, April 9, 2018

Free Pattern of the Week!

This weeks free pattern is Marguerite Dishcloth from KnitPicks.
Marguerite Crochet Dishcloth
Finished Measurements 9.5” x 8.5”
Hook US J (5mm): crochet hook

Clamshell Spike Stitch 
(Over 3 sl sts) 
Skip 1st sl st, 1 dc into sc under 2nd sl st, 1 dc into the sc of the row below that (3 rows down), 1 dc into sc under 2nd sl st again, skip 3rd sl st. 

Directions 

With Color A, ch 34 Setup rows 

Row 1: Sc in second ch from hook, then sc in each ch to end. Turn. 

Row 2: Ch 1. Sc in the first stitch, and then sc into each st along the row to end. Turn . 

Pattern repeat 

Row 3: Sl st in next 2 st, *hdc into the next st, dc in next 3 sts, hdc in next st, sl st in next 3 sts* rep from * to * to last 2 sts, sl st in last 2 sts. Turn. 

Attach Color B. 

Row 4: ch 3 (counts as dc), 1 dc into the next sl st, *hdc into hdc, sc in next 3 dc, hdc in hdc, work Clamshell Spike Stitch*, rep from * to * to last 2 last 2 sl sts, sc in each sl sts. Turn. 

Row 5: Ch 1, sc across entire row. Turn 

Row 6: Ch 3 (counts as dc). dc in next st, *hdc, sl st over next 3 st, hdc, dc in next 3 st* rep from * to * to last 2 sts, dc in last 2 sts. Turn. 

Attach Color C . 

Row 7: Ch 1, sc in same st, sc in next st *hdc in hdc, work Clamshell Spike Stitch, 1 hdc in hdc, 1 sc in next 3 dc* rep from * to * to last 2 sts, sc in last 2 sts. Turn. 

Row 8: Ch 1, sc across entire row. Turn. 

Row 9 Rep row 3 

Attach Color D 

Rows 10-12 Rep rows 4-6 

Attach Color A

Rows 13-15: Rep rows 7-9 

Repeat rows 3-15 once more, changing colors where indicated. 

Repeat rows 3-5 once more. 

Finishing Fasten off last stitch, weave in ends. Block if desired.


For more information, please see: http://sandra-cherryheart.blogspot.com/ 

The Original Pattern can be found at http://www.knitpicks.com/patterns/Marguerite_Crochet_Dishcloth__D55592220.html

Monday, April 2, 2018

Free Pattern of the Week!

This weeks free pattern is Cable Me Cozy Pillow Cover from KnitPicks.
Cable Me Cozy Pillow Cover
Finished Measurements 16” Square
Needles US 13 (9mm) 32” or longer circular needles

This cozy pillow cover will dress up any room. The superbulky yarn knits up quick, making for a fun project or last-minute gift. The pillow cover is knit up in one piece. Then stitches are picked up on either side for the button band, the buttons are added, and the piece is folded and seamed. 

Right Leaning Cable 
(C3B) Slip 3 sts to CN, hold in back of work: K3, K3 from CN. 

Buttonhole Instructions
 Sl first st to right needle. Move yarn to front of work. Sl next st, psso, repeat twice. (3 sts bound off.) Sl the last st from right needle back to left needle. Turn, bringing yarn to front of work. CO 4 sts. Turn. Sl first stitch. Pass the extra cast on stitch over the next stitch, then slip this stitch back to left needle 

Directions
Pillow Cover Body 
The body of the pillow cover is knit in one piece. 
Loosely CO 66 sts. 
Row 1(WS): K38, P6, K22. 
Row 2 (RS): P22, K6, P38. 
Row 3: Repeat Row 1. 
Row 4: Repeat Row 2. 
Row 5: Repeat Row 1. 
Row 6: P22, C3B, P38. 
Repeat Rows 1-6 eight times then work Row 1, or until pillow cover measures 16.25”, ending with a WS row. BO loosely. 

Button Band 
With right side facing, PU and K 32 sts from left edge of pillow cover. 
Rows 1-5: *P2, K2, rep from * to end of row. 
BO all sts in rib pattern. 

Buttonhole Band 
With right side facing, PU and K 32 sts from left edge of pillow cover. 
Rows 1-2: *K2, P2, rep from * to end of row. 
Row 3: K2, P2, *work buttonhole over next 3 sts, then work 4 sts in rib pattern, rep from * 3 times, work 4th buttonhole, then K2, P2 over remaining 4 sts. 
Rows 4-5: Rep Rows 1-2. 
BO all sts in rib pattern. 

Finishing 
Weave in ends and block. Sew buttons onto button band to correspond with the buttonholes and button the ends together. With right sides facing, fold the pillow cover so that the button band and cable panel match up. Using the scrap yarn and mattress stitch, sew the edges together. Unbutton and flip pillow cover right side out. Insert pillow form and button.


The Original Pattern can be found at http://www.knitpicks.com/patterns/Cable_Me_Cozy_Pillow_Cover__D55718220.html#