This weeks free patterns are Socks from KnitPicks. Everyone loves warmth, so make those you love something warm for their feet!
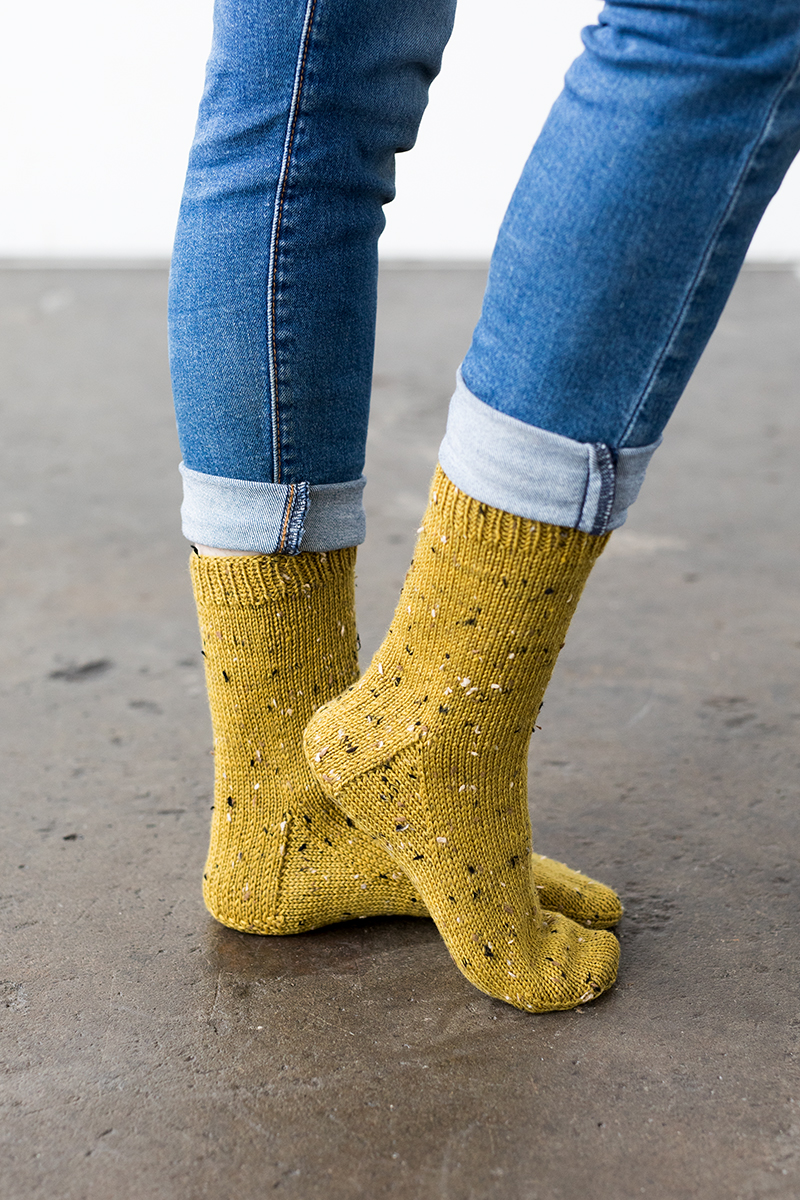
Top Down Socks
Notes: This is a simple top down sock, perfect for those wanting to practice their sock making skills. This pattern is easily adaptable for DPNs, Magic Loop or 2 circulars so you can use your favorite knitting method. For the perfect fit, measure around the widest part of your foot for the circumference and choose the size slightly smaller than your measurement (for instance, if your foot is 7.5” around, knit the 7” size). Then measure the bottom of your foot, from heel to longest toe to determine the foot length.
This pattern was written with a 5.5” leg length -but you can make it shorter or longer; however if you do the latter you may need an additional skein of yarn.
For a tutorial on the Long Tail Cast On, please see http://tutorials.knitpicks.com/wptutorials/long-tail-cast-on/
Kitchener Stitch
Hold the two pieces of knitting parallel to one another with the wrong sides facing. Thread the working yarn with a yarn needle.
*Insert the yarn needle knitwise into the first stitch on the front knitting needle. Draw through the stitch and slip the stitch off of the front needle. Insert the yarn needle purlwise into the next stitch on the front knitting needle. Draw through the stitch. Leave the stitch on the needle. Insert the yarn needle purlwise into the first stitch on the back knitting needle. Draw through the stitch and slip the stitch off of the back needle. Insert the yarn needle knitwise into the next stitch on the back knitting needle. Draw through the stitch. Leave the stitch on the needle. Repeat these steps beginning at the * until all of your stitches have been grafted together.
Directions
Leg
CO 44 (48, 56, 60, 64) using Long Tail Cast On or other CO method. 22 (24, 28, 30, 32) sts will be for instep, 22 (24, 28, 30, 32) will be for the heel. Divide over your needles; for DPNs, it is easiest is to have your heel sts on one DPN and instep sts divided evenly between 2 DPNs - 11 (12, 14, 15, 16) sts on each instep DPN. If you prefer using 5 DPNs, divide both heel & instep sts evenly over the 4 needles but be sure remember which sts are your heel and instep. For 2 circulars or Magic Loop Method, each side will have 22 (24, 28, 30, 32) st. For all methods, PM to indicate heel st and join to knit in the round, making sure not to twist sts.
Next Rnd: *K1, P1* rep between ** to end of round.
Rep rnd for 1”.
Next Rnd: K all sts.
Rep rnd until leg is 5.5” long.
Heel Flap
You will be working back & forth on only the 22 (24, 28, 30, 32) heel sts for this section.
Row 1 (RS): Sl1, K to end.
Row 2 (WS): *Sl1, p1* rep to end,
Rep rows 1-2 an additional 10 (11, 13, 14, 15) times, 11 (12, 14, 15, 16) sl sts on each side of heel flap.
Turn the Heel
Row 1 (RS): Sl1 K 12 (13, 15, 16, 17), ssk, k1 turn (there will be a gap after the k1). 1 st dec.
Row 2 (WS): Sl1, p5, p2tog, p1 turn (there will be a gap after the p1). 1 st dec.
Row 3: Sl1, k to 1 st before the gap, ssk (1 st from each side of the gap), k1 turn. 1 st dec.
Row 4: Sl1, p to 1 st before the gap p2tog (1 st from each side of the gap), p1, turn. 1 st dec.
Repeat rows 3-4 until all sts have been worked.
Gusset
You will now begin to work in the round again. If using 4 DPNs, you may want to now put all instep stitches on one needle and divide the heel stitches between 2 needles.
Next Rnd: K across heel sts, then PU and k 11 (12, 14, 15, 16) sl sts along heel flap, PU & k 2 sts at top of gusset, k 22 (24, 28, 30, 32) across instep stitches, PU & k 2 sts at top of gusset, PU & k 11 (12, 14, 15, 16) along heel flap.
K across remaining heel sts, then k across instep. You are now at the start of the heel sts, pm to mark beginning of round.
Rnd 1: K1, SSK, k to last 3 sts of heel k2tog, k1, k across instep sts. 2 heel sts dec.
Rnd 2:: K all sts
Rep rnds 1-2 until you have 22 (24, 28, 30, 32) on the heel sts, 44 (48, 56, 60, 64) total.
Foot
Work in St st until total length is 2 (2, 2.5, 2.5, 2.5)” less than the total foot length, measuring from the back of the heel to the live sts.
Toe
Rnd 1: *K1, ssk, k to last 3 heel sts, k2tog, k1* rep between ** over instep sts. 4 sts dec.
Rnd 2: k all sts.
Rep rnds 1-2 8 (8, 10, 10, 10) more times until 4 (6, 6, 8, 10) sts remain for heel and 4 (6, 6, 8, 10) for instep - 8 (12, 12. 16. 20) sts total. Break yarn, leaving an 12” tail. If using DPNs, place instep stitches on one needle and heel stitches on one needle. Graft instep and heel sts together using Kitchener Stitch.
Finishing
Weave in ends and block to measurements.
The Original Patterns can be found at http://www.knitpicks.com/cfPatterns/Pattern_List_Filtered.cfm?PROJECT-TYPE=30025218&FREE-PAID=Free&showAll=yes