Thursday, June 29, 2017

Backpacks: How to Choose

Backpacks: How to Choose
Being an Outdoor Guide means that everyone asks you questions. Here are some tips and tricks that you can use!


Heading to the backcountry? Your goal is to find a backpack that fits your:
  • Trip length—are you going out for an overnighter or for a week or more?
  • Personal style of backpacking—are you more into comfort or weight savings? Is your gear old and bulky or weight- and space-efficient?
  • Body type—your torso length, not your height, matters most.
Video: How to Choose a Backpacking Pack
Backpacks by Trip Length and Capacity
The following is a general guide for which pack sizes (measured in liters) typically work well for backpackers during warm-weather hikes of varying lengths. Colder-weather trips usually require a larger pack, while ultralight backpackers may choose to go smaller than the recommendations here.
Length of trip
Pack capacity (liters)
Weekend (1–3 nights)
35–50
Multiday (3–5 nights)
50–80
Extended (5+ nights)
70+
Weekend (1–3 nights; 35–50 liters)
Efficient packers using newer, less-bulky gear can really keep things light on 1- to 3-night trips by using a pack in this range. Be aware that packing light requires self-discipline and careful planning. If you can pull it off, though, the light-on-your-feet rewards are fantastic.
Multiday (3–5 nights; 50–80 liters)
These are the most popular backpacking packs sold, and they’re an excellent choice for warm-weather trips lasting 3 or more days. 50–80 liter packs are also used for backcountry skiing, for day trips, overnighters and sometimes 2-night trips.
Extended-trip (5+ nights; 70 liters or larger)

Extended trips of 5 days or more usually call for packs of 70 liters or larger. These are also usually the preferred choice for:
  • Winter treks lasting more than 1 night. Larger packs can more comfortably accommodate extra clothing, a warmer sleeping bag and a 4-season tent (which typically includes extra poles).
  • Adults taking young children backpacking. Mom and Dad wind up carrying a lot of kids’ gear to make the experience enjoyable for their young ones.
Climbing Packs
Most have modest capacities that are appropriate only for day trips or overnighters. Common features include:
  • The ability to strip down the pack to its minimal weight (removing the lid, framesheet and possibly the hipbelt) for use during a summit push.
  • A narrower, sleeker, sometimes higher profile than a usual packbag, permitting unencumbered arm movement.
  • Several lash-on points for external tool attachment.
  • A daisy chain—a length of webbing stitched to the outside of a pack—to provide multiple gear loops for attaching a helmet or tools.
  • A reinforced crampon patch (to prevent crampon points from gouging holes in the packbag).
  • Gear loops on the hipbelt or low on the pack body, useful as clip-on points for gear or possibly as attachment points for skis.
Backpack Fit
The right fit is one that offers:
  • A size appropriate for your torso length (not your overall height).
  • A comfortably snug grip on your hips.
Torso Length
Some packs are available in multiple sizes, from extra small to large, which fit a range of torso lengths. These ranges vary by manufacturer and by gender. Check the product specs tab for size details of a specific pack. 
Other packs may feature an adjustable suspension, which can be modified to fit your torso, especially if you’re in between sizes. The drawback: An adjustable harness adds a little weight to a pack.
Waist Size
The majority of a backpack’s weight, 80% or more, should be supported by your hips.
Backpack hipbelts usually accommodate a wide range of hip sizes, from the mid-20 inches to the mid-40 inches.
People with narrow waists sometimes find they cannot make a standard hipbelt tight enough and need a smaller size. Some packs offer interchangeable hipbelts, making it possible to swap out one size for another.
Women-Specific Backpacks
These are engineered specifically to conform to the female frame. Torso dimensions are generally shorter and narrower than men’s packs. And hipbelts and shoulder straps are contoured with the female form in mind.
Youth-Specific Backpacks
These typically offer smaller capacities and include an adjustable suspension to accommodate a child’s growth. Women’s backpacks, with their smaller frame sizes, often work well for young backpackers of either gender. So do small versions of some men’s packs.
Additional Backpack Fit Adjustments
Load lifter straps are stitched into the top of the shoulder straps, and they connect to the top of the pack frame. Ideally, they will form a 45° angle between your shoulder straps and the pack. Kept snug (but not too tight), they prevent the upper portion of a pack from pulling away from your body, which would cause the pack to sag on your lumbar region.
Sternum strap: This mid-chest strap allows you to connect your shoulder straps, which can boost your stability. It can be useful to do so when traveling on uneven cross-country terrain where an awkward move could cause your pack to shift abruptly and throw you off-balance.
Backpack Frame Type
Internal-frame backpacks: The majority of packs sold today are body-hugging internal frame packs that are designed to keep a hiker stable on uneven, off-trail terrain. They may incorporate a variety of load-support technologies that all function to transfer the load to the hips.
External-frame backpacks: An external-frame pack may be an appropriate choice if you’re carrying a heavy, irregular load. Toting an inflatable kayak to the lake or heading out to the backcountry with surveying tools? An external frame pack will serve you best. External frame packs also offer good ventilation and lots of gear organization options.
Frameless backpacks: Ultralight devotees who like to hike fast and light might choose a frameless pack or a climbing pack where the frame is removable for weight savings.
Backpack Features
Main compartment access:
  • Top-loading openings are pretty standard. Items not needed until the end of the day go deep inside.
  • Some packs also offer a zippered front panel that folds open exposing the full interior of the pack, or a side zipper, which also makes it easier to reach items deeper in your pack.
Sleeping bag compartment: This is a zippered stash spot near the bottom of a pack. It’s a useful feature if you don’t want to use a stuff sack for your sleeping bag. Alternately, this space can hold other gear that you’d like to reach easily.
Top lid: Many packs offer a zippered top lid where most backpackers store quick-access items: sunscreen, insect repellent, camera, snacks, map. Some lids detach from the main pack and convert into a hipbelt pack for day trips.
Pockets: Typical offerings:
  • Elasticized side pockets: They lie flat when empty, but stretch out to hold a water bottle, tent poles or other loose objects.
  • Hipbelt pockets: These accommodate small items you want to reach quickly—a smartphone, snacks, packets of energy gel, etc.
  • Shovel pockets: These are basically flaps stitched onto the front of a packbag with a buckle closure at the top. Originally intended to hold a snow shovel, they now pop up on many 3-season packs, serving as stash spots for a map, jacket or other loose, lightweight items.
  • Front pocket(s): Sometimes added to the exterior of a shovel pocket, these can hold smaller, less bulky items.
Ventilation: This can be a drawback of internal-frame designs. Much of the pack rides on your back, cutting airflow and accelerating sweaty-back syndrome. Designers have addressed this in a variety of ways—ventilation "chimneys" built into back panels, for example.
A few packs have engineered a suspended mesh back panel, sometimes called "tension-mesh suspension." This is a trampoline-like design where the frame-supported packbag rides along a few inches away from your back, which instead rests against the highly breathable mesh.  
Padding: If you’re using a lightweight pack with a fairly minimalistic hipbelt and lumbar pad, you can encounter sore spots on your hips and lower back. If this is the case for you, consider using a cushier hipbelt.
Attachment points: If you frequently travel with an ice axe or trekking poles, look for tool loops that allow you to attach them to the exterior of the pack. Rare is the pack that does not offer at least a pair of tool loops.
Backpack Accessories
Raincover: Pack fabric interiors are usually treated with a waterproof coating. Yet packs have seams and zippers where water can seep through, and the fabric’s exterior absorbs some water weight during a downpour.
The solution is a raincover, which could be a plastic garbage bag (cheap but clumsy) to a more customized packcover. If you expect rain on your trip, this is a good item to carry. An alternative: bundling gear internally in waterproof “dry” stuff sacks. Lightweight dry sacks can be a better option in windy conditions; strong gusts have the potential to abruptly peel a cover right off a pack.
Hydration reservoir: Nearly all packs offer an internal sleeve into which you can slip a hydration reservoir (almost always sold separately) plus 1 or 2 "hose portals" through which you can slip the sip tube.


Article and others like it found at REI.com

Monday, June 26, 2017

Free Pattern of the Week!

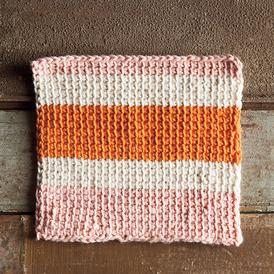
This weeks free pattern is Sherbet Tunisian Dishcloth from KnitPicks.
Sherbet Tunisian Crochet Dishcloth
Finished Measurements Any size; sample shown 6” square
Hooks US H-8 (5.0mm) interchangeable crochet hook


A big thing you need to keep in mind is that you will go back and forth on your work and never turn. The right side of your work is always facing you. 

There will be a Forward Row and a Return Row. On the Forward Row you will be working right to left and on the Return Row you will work left to right. Basically you are just zig-zagging back and forth. Try to work loosely if possible. This will help prevent your work from curling. 

Changing colors When two stitches remain at the end of the Return Row, use the new color to draw through both loops. Work the forward row as usual. 

Directions
With color A, Chain 30 or to desired size 

Preparation Row: Working into the bumps of the back side of the chain, start with the second bump from the hook. Insert the hook into the bump, yarn over and pull a loop through, leaving it on the hook. Continue with each chain bump, all the way to the end of the foundation chain. 

Row 2 (Return Row): Chain 1. Yarn over and pull a loop through the next two stitches on the hook. Repeat this last step until one stitch remains on the hook. Remember that you don’t turn the work; just keep the same side facing you! 

Row 3 (Forward Row): For the Forward Row you will insert the hook through vertical bars created by the previous row. Skip the first vertical bar from previous row. Insert your hook into the second vertical bar. Yarn over and pull a loop through, leaving it on the hook. Now you have two loops on your hook. Continue to pull a loop through each vertical bar until you reach the end of the row. Finish by inserting the hook into the chain one from the previous row and pulling a loop through. (If you’d like a very sturdy edge, make this final stitch through both strands of the chain one.) Do not turn. 

Repeat Rows 2-3 for 1.5” or desired size, ending with row 2, while following Changing Color instructions, attach Color B.- 

Repeat Row 3, then rows 2-3 for 1” or to desired size, ending with row 2, while following Changing Color instructions, attach Color C. 

Repeat Row 3, then rows 2-3 for 1.5” or to desired size, while following Changing Color instructions, attach Color B. 

Repeat Row 3, then rows 2-3 for 1” or to desired size, ending with row 2, while following Changing Color instructions, attach Color A. 

Repeat Row 3, then rows 2-3 for .5” or to desired size, ending after row 2. 

Finishing
Finish off on a Forward Row. Insert the hook into the first vertical strand, yarn over and draw the loop through both the vertical strand and the stitch on the hook. Repeat this step of drawing a loop through both the vertical stitch and the stitch on the hook until the end of the row. Then cut the yarn and pull it through the last loop. 


The Original Pattern can be found at http://www.knitpicks.com/patterns/Sherbet_Tunisian_Crochet_Dishcloth__D55574220.html

Saturday, June 24, 2017

Baby - Nursery Rhymes and Lullabies 5

Image result for Lullabies clipart


Nursery Rhymes and Lullabies

Nursery rhymes and lullabies can be an entertaining way to accomplish many goals, whether you're trying to help a tired baby go to sleep, or teach a toddler how to count.

Little Stars, Blind Mice and Yankee Doodle

Twinkle, Twinkle, Little Star

Twinkle, twinkle, little star,
How I wonder what you are.
Up above the world so high,
Like a diamond in the sky,
Twinkle, twinkle, little star,
How I wonder what you are.
When the blazing sun is gone,
When he nothing shines upon,
Then you show your little light,
Twinkle, twinkle, all the night.
Twinkle, twinkle, little star,
How I wonder what you are.
Then the traveler in the dark,
Thanks you for your tiny spark;
He could not see which way to go,
If you did not twinkle so.
Twinkle, twinkle, little star,
How I wonder what you are.

Three Blind Mice

Three blind mice,
Three blind mice,
See how they run!
They all ran after the farmer's wife,
Who cut off their tails,
With a carving knife.
Did you ever see such a thing in your life,
As three blind mice.

Yankee Doodle

Yankee Doodle came to town,
Riding on a pony,
Stuck a feather in his hat,
And called it macaroni.
Yankee Doodle keep it up,
Yankee Doodle dandy,
Mind the music and the steps,
And with the girls be handy.
Father and I went down to camp,
Along with Captain Gooding,
And there we saw the men and boys,
As thick as hasty pudding.
Yankee Doodle keep it up,
Yankee Doodle dandy,
Mind the music and the steps,
And with the girls be handy.


Thursday, June 22, 2017

My New Favorite App

Hello everyone! This App saved me this holiday season, but I am just now telling you about it. The All Recipes Dinner Spinner


The app is Awesome! You can look up recipes by the ingredient you have or by the ingredient you don't want included. You get to save your favorite to your personal recipe box and still get to make your own shopping list.

You should Check it out!


* I am in no way getting any gain for advertising these services

Monday, June 19, 2017

Free Pattern of the Week!

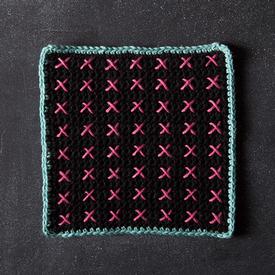
This weeks free pattern is Jerrica Dishcloth from KnitPicks.
The Jerrica Dishcloth
Finished Measurements 7” square.Hooks F-5 (3.75mm)

 This truly outrageous dishcloth uses simple single crochet throughout and a small amount of embroidery for a quick and fabulous project. You’ll feel like a superstar every time you wash the dishes! 

Directions With MC, ch 30 sts. 
Row 1: Sc in 2nd ch, sc across to end of row, turn. 
Row 2 - 32: Ch 1, sc across to end of row, turn. 
Fasten off after Row 32. 

Border 
Row 1: With CC1, insert hook into a corner sp and sc, ch1, sc in same sp, 1 sc in every sc to next corner, (sc, ch1, sc) into corner sp, 28 sc alongside the edge to next corner, (sc, ch1, sc) into corner sp, 1 sc in every sc to next corner, (sc, ch1, sc) into corner sp, 28 sc alongside the edge. Sl st in first sc to join and fasten off. 

Cross Stitching Embroidery Using a long length of CC2 and a tapestry needle, begin at the bottom right-hand corner of the square with RS facing and insert the needle into the space of the first st and 1 row from corner. Work cross stitch pattern over 2 sts and 2 rows. Sk 1 row, bring needle up in row above and matching to the cross stitch that was just made. Work next cross stitch and repeat up the length of the dishcloth until you are 1 row from the top. 
Rotate dishcloth 180 degrees, sk 1 st and make next row of stitches alighled with the last, moving to the bottom edge of the dishcloth. 
Repeat until the dishcloth is covered, leaving a space of 1 row at the top and bottom, and 1 st at either side. 

Finishing Fasten off and weave in ends. Wash and block to size.  

The Original Pattern can be found at http://www.knitpicks.com/patterns/The_Jerrica_Dishcloth__D55599220.html

Saturday, June 17, 2017

Baby - Nursery Rhymes and Lullabies 4

Image result for Lullabies clipart

Nursery Rhymes and Lullabies


Nursery rhymes and lullabies can be an entertaining way to accomplish many goals, whether you're trying to help a tired baby go to sleep, or teach a toddler how to count.

Longer Songs

Rock a Bye Baby

Rock-a-bye, baby
In the treetop.
When the wind blows,
The cradle will rock.
When the bough breaks,
The cradle will fall,
And down will come baby,
Cradle and all.
Baby is drowsing,
Cosy and fair.
Mother sits near,
In her rocking chair.
Forward and back,
The cradle she swings,
And though baby sleeps,
He hears what she sings.

Star Light, Star Bright

Star light , star bright,
First 1st star I see tonight,
I wish I may, I wish I might,
Have the wish I wish tonight.

This Little Piggy

This little piggy went to market;
This little piggy stayed home;
This little piggy had roast beef;
This little piggy had none;
This little piggy said,
"Wee, wee, wee," all the way home.

This Old Man

This old man, he played one,
He played knick knack on his thumb,
With a knick, knack, paddy whack,
Give the dog a bone;
This old man came rolling home.
This old man, he played two,
He played knick knack on his shoe,
With a knick, knack, paddy whack,
Give the dog a bone;
This old man came rolling home.
This old man, he played three,
He played knick knack on his knee,
With a knick, knack, paddy whack,
Give the dog a bone;
This old man came rolling home.
This old man, he played four,
He played knick knack on his door,
With a knick, knack, paddy whack,
Give the dog a bone;
This old man came rolling home.
This old man, he played five,
He played knick knack on his hive,
With a knick, knack, paddy whack,
Give the dog a bone;
This old man came rolling home.
This old man, he played six,
He played knick knack on his sticks,
With a knick, knack, paddy whack,
Give the dog a bone;
This old man came rolling home.
This old man, he played seven,
He played knick knack with his pen,
With a knick, knack, paddy whack,
Give the dog a bone;
This old man came rolling home.
This old man, he played eight,
He played knick knack on his gate,
With a knick, knack, paddy whack,
Give the dog a bone;
This old man came rolling home.
This old man, he played nine,
He played knick knack, rise and shine,
With a knick, knack, paddy whack,
Give the dog a bone;
This old man came rolling home.
This old man, he played ten,
He played knick knack on his hen,
With a knick, knack, paddy whack,
Give the dog a bone;
This old man came rolling home.
This old man, he played eleven,
He played knick knack up in heaven,
With a knick, knack, paddy whack,
Give the dog a bone;
This old man came rolling home.
This old man, he played twelve,
He played knick knack, dig and delve,
With a knick, knack, paddy whack,
Give the dog a bone;
This old man came rolling home.

Thursday, June 15, 2017

DIY Bath Bombs Recipe

Drop these colorful homemade bath bombs into the tub & watch the natural bubbling action. Made with Baking Soda, they're a gentle way to soothe & soften skin.


Ingredients
-          2 tsp unsweetened lemon drink mix
-          1 tsp flour or cornstarch
-          4 tsp Baking Soda
-          4 tsp baby oil or mineral oil
-          food coloring
-          Wax paper

Directions
-          Mix 2 tsp unsweetened lemon drink mix, 1 tsp flour or cornstarch, and 4 tsp Baking Soda in a bowl.
-          Mix 4 tsp baby oil or mineral oil with 3-6 drops food coloring in a separate bowl.
-          Slowly mix the colored mixture into the dry ingredients.
-          Make small 1" balls of mixture or into a mold. Place on wax paper to dry.
-          It takes 24-48 hours for bombs to dry completely.

-          Fill your bathtub. Drop in a couple of bath bombs & enjoy or give as gifts!

Monday, June 12, 2017

Free Pattern of the Week!

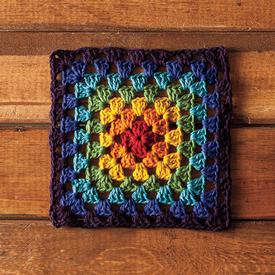
This weeks free pattern is Granny's Rainbow Dishcloth from KnitPicks.
Granny’s Rainbow Dishcloth
Finished Measurements Approximately 7” Square
Hooks US G/6 (4mm)


Create a colorful splash in your kitchen with a classic stitch pattern in a fun color range. Rotate the center starter color of your Granny’s Rainbow dishcloth to create a matching set or use only 2 alternating colors to match your décor. 

Directions With first color, ch 5, join last ch to first ch with sl st to form a ring. 

Round 1: Continuing in same color, ch 3 (counts as first dc here and throughout), 2 dc in ring, ch 2, (3dc in ring, ch 2) 3 more times, join with sl st in top ch of initial ch 3, ch 1, fasten off. Do not turn. 

Round 2: Join next color with sl st to any ch 2 sp, ch 3, (2dc, ch 2 3 dc) all in same ch 2 sp, (3dc, ch 2, 3dc, ch 1) in each ch 2 sp around, join with sl st in top ch of initial ch 3, ch 1, fasten off. Do not turn. 

Round 3: Join next color with sl st to any ch 2 sp, ch 3, (2dc, ch 2 3 dc) all in same ch 2 sp, ch 1, 3 dc in next ch 1 sp, ch 1, (3dc, ch2, 3 dc) in next ch 2 sp, ch , 3 dc in next ch 1 sp, ch 1* repeat from * to * around, join with sl st in top ch of initial ch 3, ch 1, fasten off. Do not turn. 

Round 4: Join next color with sl st to any ch 2 sp, ch 3, (2dc, ch 2 3 dc) all in same ch 2 sp, ch 1, (3 dc in next ch 1 sp, ch 1) twice, *(3dc, ch2, 3 dc) in next ch 2 sp, ch 1, (3 dc in next ch 1 sp, ch 1) twice * repeat from * to * around, join with sl st in top ch of initial ch 3, ch 1, fasten off. Do not turn. 

Round 5: Join next color with sl st to any ch 2 sp, ch 3, (2dc, ch 2 3 dc) all in same ch 2 sp, ch 1, (3 dc in next ch 1 sp, ch 1) three times, *(3dc, ch2, 3 dc) in next ch 2 sp, ch 1, (3 dc in next ch 1 sp, ch 1) three times* repeat from * to * around, join with sl st in top ch of initial ch 3, ch 1, fasten off. Do not turn. 

Round 6: Join next color with sl st to any ch 2 sp, ch 3, (2dc, ch 2 3 dc) all in same ch 2 sp, ch 1, (3 dc in next ch 1 sp, ch 1) four times, *(3dc, ch2, 3 dc) in next ch 2 sp, ch 1, (3 dc in next ch 1 sp, ch 1) four times * repeat from * to * around, join with sl st in top ch of initial ch 3, ch 1, fasten off. Do not turn. 

Round 7: Join next color with sl st to any ch 2 sp, ch 3, (2dc, ch 2 3 dc) all in same ch 2 sp, ch 1, (3 dc in next ch 1 sp, ch 1) five times, *(3dc, ch2, 3 dc) in next ch 2 sp, ch 1, (3 dc in next ch 1 sp, ch 1) five times * repeat from * to * around, join with sl st in top ch of initial ch 3, ch 1, fasten off. 

Do not turn. Finishing Weave in all ends, wash

The Original Pattern can be found at http://www.knitpicks.com/patterns/Granny%E2%80%99s_Rainbow_Dishcloth__D55812220.html

Saturday, June 10, 2017

Baby - Nursery Rhymes and Lullabies 3

Image result for Lullabies clipart

Nursery Rhymes and Lullabies


Nursery rhymes and lullabies can be an entertaining way to accomplish many goals, whether you're trying to help a tired baby go to sleep, or teach a toddler how to count.

Short and Sweet

The Cat and the Fiddle

Hey diddle diddle, the cat and the fiddle,
The cow jumped over the moon,
The little dog laughed to see such sport,
And the dish ran away with the spoon.

Little Miss Muffet

Little Miss Muffet sat on a tuffet,
Eating her curds and whey.
There came a big spider,
He sat down beside her.
And frightened Miss Muffet away!

Mary, Mary, Quite Contrary

Mary, Mary, quite contrary,
How does your garden grow?
With silver bells and cockle shells,
And pretty maids all in a row.

Mary Had a Little Lamb

Mary had a little lamb,
Little lamb, little lamb,
Mary had a little lamb,
Its fleece was white as snow.
Everywhere that Mary went,
Mary went, Mary went,
Everywhere that Mary went,
The lamb was sure to go.
It followed her to school one day,
School one day, school one day,
It followed her to school one day,
Which was against the rules.
It made the children laugh and play,
Laugh and play, laugh and play,
It made the children laugh and play,
To see a lamb in school.

Thursday, June 8, 2017

Backpacking: How to Hoist a Loaded Pack

Backpacking: How to Hoist a Loaded Pack

Being an Outdoor Guide means that everyone asks you questions. Here are some tips and tricks that you can use!


A fully loaded backpack can get pretty heavy, so follow these steps to get it from the ground to your back more easily:
1.      With you standing and your pack sitting upright on the ground, use one hand to grab the pack's haul loop. (That's the webbing loop on top of the pack.)
2.      Using a wide stance with knees bent, slide the pack up to your thigh and let it rest.
3.      Steadying the pack with one hand still on the haul loop, slip your other arm and shoulder through one of the shoulder straps, pushing your shoulder in as far as you can.
4.      Without any abrupt or jerking motions, lean forward and swing the pack onto your back and slip your arm through the other shoulder strap.
5.       Buckle the hipbelt first, then stand up straight and cinch down the shoulder straps. Adjust the load-lifter straps (located at the tops of the shoulder straps) to pull the pack inward. Lastly, buckle the sternum strap across your chest.
Whenever you're ready to take off your pack, it's easiest to loosen the shoulder straps in addition to unbuckling the hipbelt and sternum strap.
Tip: As you hike throughout the day, slightly vary the tightness of your hipbelt and shoulder straps to help your hips and shoulders feel less fatigued.

Article and others like it found at REI.com
Monday, June 5, 2017

Free Pattern of the Week

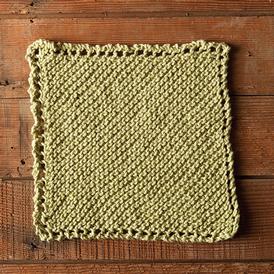
This weeks Free pattern is Phyllis & Marian Dishcloth from KnitPicks.
Phyllis & Marian Dishcloth
FINISHED MEASUREMENTS 8.5 x 8.5”
NEEDLES US 7 (4 mm) or size to obtain gauge

This dishcloth pattern has been knit for decades by the women in my family and is named after my grandmother and great-aunt, both of whom have made more of these practical, easy dishcloths than I can recall. Knit flat on the bias, the pattern blends function with decoration in the yarn-over border, which hide the increases and decreases with flair. I hope it will find a place in your family as it has in mine! 

DIRECTIONS 
Cast on 4 sts. 
K1, YO, knit to end of row. 
Continue in pattern until you have 45 stitches. 
Next row: k2tog, YO, k2tog, knit to end of row. 
Continue in pattern until only 4 stitches are left. 
BO all sts. 

Finishing Weave in ends and block.

The Original Pattern can be found at http://www.knitpicks.com/patterns/Phyllis_Marian_Dishcloth__D55572220.html

Saturday, June 3, 2017

Baby - Nursery Rhymes and Lullabies 2

Image result for Lullabies clipart

Nursery Rhymes and Lullabies


Nursery rhymes and lullabies can be an entertaining way to accomplish many goals, whether you're trying to help a tired baby go to sleep, or teach a toddler how to count.

Easy Songs

Baa, Baa, Black Sheep

Baa, baa, black sheep,
Have you any wool?
Yes sir, yes sir,
Three bags full.
One for the master,
One for the dame,
And one for the little boy
Who lives down the lane.
Baa, baa, black sheep,
Have you any wool?
Yes sir, yes sir,
Three bags full.

I'm a Little Tea Pot

I'm a little teapot short and stout,
Here is my handle, here is my spout,
When I get all steamed up hear me shout,
Tip me over and pour me out.

Humpty Dumpty

Humpty Dumpty sat on a wall.
Humpty Dumpty had a great fall.
All the king's horses,
And all the king's men,
Couldn't put Humpty together again.

Jack Be Nimble, Jack Be Quick

Jack be nimble,
Jack be quick,
Jack jump over the candlestick.

Thursday, June 1, 2017

Home Made Fruit Roll Ups

Here is a healthy snack that you can have to start being healthy. All you need is an oven or dehydrator and a few extra ingredients.


General Homemade Fruit Roll-Ups

INGREDIENTS
  • 2 1/2 – 3 cups ripe or slightly over-ripe diced fruit
  • Sweetener to taste: honey, sugar, agave, etc.
  • 2 teaspoons fresh lemon juice
  • Optional: seasonings, spices, extracts to taste
  • 3⁄4cup applesauce 
  • Nonstick cooking spray Recipe
DIRECTIONS
1.      Preheat oven to lowest temperature.  140° or higher if using an oven.
2.      Purée all ingredients in a food processor until smooth.
3.      Spray the fruit leather sheet of your dehydrator (the one without holes) with a light coating of non-stick cooking spray. Pour the puréed fruit carefully into the tray set into the bottom section of your dehydrator. Dehydrate at full power for up to 8 hours, depending on the power of your machine, checking periodically toward the end of that time to see that there aren't any wet or sticky spots.
4.      If using oven, Pour onto a baking sheet lined with plastic wrap, or a silicone baking mat (don’t use foil, parchment, or waxed paper), and spread to 1/8″ thick.  Place in oven and bake for 6-8 hours, until center is not tacky anymore. 
5.      When done, cool for a couple of minutes and carefully slide a butter knife or thin spatula under the leather. Cut into strips and roll in parchment or plastic.  Store in airtight container or freeze.
Tips:
-All fruits will produce slightly different results. You might have to experiment to find what works well.  If you’re going to make a giant batch, you may want to test one first to make sure it works well.
– The addition of sugar or honey enhances the texture and makes the fruit roll ups a little more chewy than if you leave it out.
– If using plastic wrap, it will shrink a little as the fruit dries, so do leave a little extra around the edges.  A silicone baking mat works the absolute best in my opinion.