Monday, February 27, 2017

Free Pattern of the Week!

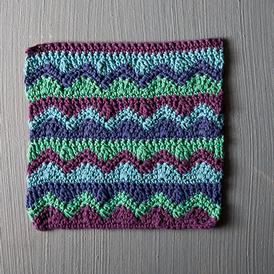
This weeks Free pattern is Mismatched Dishcloth from KnitPicks.

Mismatched Crochet Dishcloth


Finished Measurements Approx 8.5” x 9”
Hooks US 7 (4.5mm): crochet hook
Notions Yarn Needle
Gauge 3.5 st = 1” in single crochet (Gauge for this project is approximate)


This dishcloth pattern includes both waves & chevron with mismatched stripes for a unique look for your dishcloth. In this pattern, you will simply switch colors every 2 rows; using four colors will give you wave in each color but this is an easy pattern to customize to as many or as few colors as you would like. Adapted from Basic Crochet Stitches.

Single Crochet 3 Together (sc3tog) (Insert hook in next st, yarn over, pull lp through st) 3 times (4 lps on hook). Yarn over and draw yarn through all 4 loops on hook

Treble Crochet 3 Together (tr3tog) (yo twice, insert hook into next st, yo, pull through 2 lps, yo, pull through 2 lps) 3 times. (4 lps on hook). Yo, draw yarn through all 4 lps on hook.

Directions

With color 1, Ch 32

Set up row (RS): skip 2ch (counts as sc), sc in each ch to end, turn

Row 1 (WS): 1 ch (counts as sc), skip 1 st *hdc in next st, dc in next st, 3tr in next st, 1 dc in next st, hdc in next st, sc in next st; rep from * to end, turn. (change color)

Row 2 (RS): 1 ch, skip 1 st, sc in next st (counts as sc2tog), sc in each of next 2 sts, *3sc in next st, sc in each of the next 2 st, over next 3 sts work 3sctog, sc in each of the next 2 st; rep from * rep from * to last 2 sts, work 2sctog over last 2 st, turn

Row 3 (WS): rep row 2 (change color)

Row 4 (RS): 4ch, skip 1 st, tr into next st (counts as tr2tog), *dc into next st, hdc in next st, sc in next st, hdc in next st, dc in next st, over next 3 st work tr3tog, rep from * to last 2 st, over last 2 st, work tr2tog, skip tch, turn.

Row 5 (WS): 1 ch (counts as sc), skip 1, sc in each st to end, turn (change color)

Row 6 (RS): rep row 5

Repeat rows 1- 6 (3) more times, remembering to switch colors every 2 rows and ending after Row 6. Final row (WS): 1 ch (counts as sc), skip 1, sc in each st to end, fasten off.

Finishing Weave in ends, block if desired.


The Original Pattern can be found at http://www.knitpicks.com/patterns/Mismatched_Crochet_Dishcloth__D55560220.html

Thursday, February 23, 2017

Backcountry Skiing/Snowboarding Checklist

Backcountry Skiing/Snowboarding Checklist
Being an Outdoor Guide means that everyone asks you questions. Here are some tips and tricks that you can use!

Gear Choices
  • Skis, snowboard or splitboard
  • Boots
  • Poles (if skiing)
  • Goggles
  • Helmet
  • Climbing skins
  • Ski wax, skin wax, waxing tools
  • Crampons/ski crampons
  • Pack
  • Avalanche transceiver
  • Snow shovel
  • Probe
  • Slope meter and snowpit analysis kit
  • Avalung or avalanche airbag survival pack
  • Multifunction watch (with altimeter)
  • Whistle/signaling mirror
  • Ice axe/Whippet self-arresting ski pole
  • Route description or guidebook
The Ten Essentials
For safety, survival and basic comfort:
1. Navigation
  • Map (with protective case)
  • Compass
  • GPS (optional)
2. Sun protection
  • Sunscreen
  • Lip balm
  • Sunglasses
3. Insulation
  • Jacket, vest, pants, gloves, hat (see Clothing Options)
4. Illumination
  • Headlamp or flashlight (plus spare)
  • Extra batteries (kept near body when cold)
5. First-aid supplies
  • First-aid kit
6. Fire
  • Matches or lighter
  • Waterproof container
  • Fire starter (for emergency survival fire)
7. Repair kit and tools
  • Knife or multi-tool
  • Repair/duct tape strips; repair items as needed
8. Nutrition
  • Extra day's supply of food
9. Hydration
  • Water bottles or hydration system (insulated)
  • Water filter or other treatment system
10. Emergency shelter
  • Tent, tarp, bivy or reflective blanket
Clothing
  • Wicking base layers (synthetic or wool)
  • Fleece jacket or vest (insulating mid layer)
  • Fleece pants
  • Insulating jacket (down or poly-fill)
  • Waterproof/breathable jacket (or soft shell)
  • Waterproof/breathable pants or bibs (or soft shell)
  • Insulating hat, cap, balaclava or headband
  • Bandana or Buff (neck or face gaiter)
  • Sun-shielding cap or hat for bright days
  • Gloves, mittens and/or overmittens
  • Light gloves (for high-energy activity)
  • Socks (synthetic or wool)
  • Liner socks
  • Gaiters
Personal Items
  • Toilet paper
  • Sanitation trowel and/or WAG Bags
  • Hand sanitizer
  • Quick-dry towel
Other Options
  • Lunch
  • Energy food (bars, gels, chews, trail mix)
  • Energy beverages or drink mixes
  • Vacuum bottle (for hot drinks)
  • Insulated sitting pad
  • Handwarmer/footwarmer packets
  • Camera
  • Binoculars
  • Permits/passes
  • Two-way radios
  • Personal locator beacon
  • Cell phone or satellite messenger
  • Credit card/cash/photo ID
  • Notebook and pen or pencil
  • Music player with headphones
  • Post-activity snacks, water and beverages
  • Towel and post-activity change of clothing
  • Trip itinerary left with friend + under car seat
Article and others like it found at REI.com

Monday, February 20, 2017

Free Pattern of the Week!

This weeks Free pattern is Neutral Stripes Dishcloth from KnitPicks.
Neutral Stripes Dishcloth


Finished Measurements Approx. 8.5” x 11” 
Needles Size 5 (3.75mm): straight or circular or size to optain gauge 
Notions Yarn Needle Gauge 5 sts=1” in garter stitch

This little pattern is quick and easy - perfect for beginners. Using only garter stitch, the stripe pattern creates a fun look for any kitchen - use the neutral colors shown here or branch out in bright colors to match your kitchen. Notes: Garter Stitch (RS and WS): K all stitches 

Directions CO 60 sts using long tail cast on. 
Using MC, work 16 rows in garter stitch (8 garter ridges). 
Using CC1, work 8 rows in garter stitch (4 garter ridges). 
Using MC, work 8 rows in garter stitch (4 garter ridges). 
Using CC1, work 16 rows in garter stitch (8 garter ridges). 
Using CC2, work 8 rows in garter stitch (4 garter ridges). 
Using CC1, work 8 rows in garter stitch (4 garter ridges). 
Using CC2, work 16 rows in garter stitch (8 garter ridges). 
BO all sts. 

Finishing Weave in ends, block if desired.

The Original Pattern can be found at http://www.knitpicks.com/patterns/Neutral_Stripes_Dishcloth__D55554220.html

Thursday, February 16, 2017

Refill Foaming Hand Soap

Have any empty foaming liquid hand soap containers hanging around? What to reuse the container and save on soap? Well, just refill them!
In order to refill the container without clogging the pump you have to water the soap down. The foaming pump works because it injects a bunch of air into a small amount of soap as it pumps.


  1. Choose a soap. Any hand soap or Dr. Bronners will do.  
  2. Fill the pump container with about 1/5th soap
  3. Fill the rest of  container to an inch from the top with water (if you add water slowly, it will not foam as much) 
  4. Put the lid on
  5.  Agitate the mixture.
  6. Use! Now you’re using less soap and wasting less plastic!

Monday, February 13, 2017

Free Pattern of the Week!

This weeks Free pattern is Queen of Hearts Dishcloth from KnitPicks.

Queen of Hearts Dishcloth

Finished Measurements 10.5” wide, flat x 9.5” high 
Needles US 6 (4.25mm) straight or circular needles, or size to obtain gauge 
Notions Yarn Needle 
Gauge 18 sts and 28 rows = 4” in Knit pattern, blocked.


Queen of Hearts Notes: This queen of heart washcloth has all rows knitted. The last stitch at every row is slipped without knitting for a nicer edge, increases are done on the second and second to last stitches of rows. 

Directions CO 2sts. 
Rows 1 – 2: K1, Sl. St. 
Row 3: KFB, KFB (4sts total) 
Row 4: K3, Sl. st. 
Row 5: K1, KFB, KFB, Sl. St. (6sts total) 
Row 6: K5, Sl. st. 
Row 7: K1, KFB, K2, KFB, Sl. St. (8sts total) 
Row 8: K7, Sl. st. 
Row 9: K1, KFB, K4, KFB, Sl. St. (10sts total) 
Row 10: K9, Sl. st. 
Row 11: K1, KFB, K6, KFB, Sl. St. (12sts total) 
Row 12: K11, Sl. st. 
Row 13: K1, KFB, K8, KFB, Sl. St. (14sts total) 
Row 14: K13, Sl. st. 
Row 15: K1, KFB, K10, KFB, Sl. St. (16sts total) 
Row 16: K15, Sl. st. 
Row 17: K1, KFB, K12, KFB, Sl. St. (18sts total) 
Row 18: K17, Sl. st. 
Row 19: K1, KFB, K14, KFB, Sl. St. (20sts total) 
Row 20: K19, Sl. st. 
Row 21: K1, KFB, K16, KFB, Sl. St. (22sts total) 
Row 22: K21, Sl. st. 
Row 23: K1, KFB, K18, KFB, Sl. St. (24sts total) 
Row 24: K23, Sl. st. 
Row 25: K1, KFB, K20, KFB, Sl. St. (26sts total) 
Row 26: K25, Sl. st. 
Row 27: K1, KFB, K22, KFB, Sl. St. (28sts total) 
Row 28: K27, Sl. st. 
Row 29: K1, KFB, K24 KFB, Sl. St. (30sts total) 
Row 30: K29, Sl. st. 
Row 31: K1, KFB, K26, KFB, Sl. St. (32sts total) 
Row 32: K31, Sl. st. 
Row 33: K1, KFB, K28, KFB, Sl. St. (34sts total) 
Row 34: K33, Sl. st. 
Row 35: K1, KFB, K30, KFB, Sl. St. (36sts total) 
Row 36: K35, Sl. st. 
Row 37: K1, KFB, K32, KFB, Sl. St. (38sts total) 
Row 38: K37, Sl. st. 
Row 39: K1, KFB, K34, KFB, Sl. St. (40sts total) 
Row 40: K39, Sl. st. 
Row 41: K1, KFB, K36, KFB, Sl. St. (42sts total) 
Row 42: K41, Sl. st. 
Row 43: K1, KFB, K38, KFB, Sl. St. (44sts total) 
Row 44 – 45: K43, Sl. st. 
Row 46: K1, KFB, K40, KFB, Sl. St. (46sts total) 
Row 47 – 50: K45, Sl. st. 
Row 51: K1, KFB, K42, KFB, Sl. St. (48sts total) 
Row 52 – 57: K47, Sl. st. 
Row 58: SSK, K43, K2tog, Sl. St. (46sts total) 
Row 59 – 62: K45, Sl. st. 
Row 63: SSK, K41, K2tog, Sl. St. (44sts total) 
Row 64 – 65: K43, Sl. st. 
Row 66: SSK, K39, K2tog, Sl. St. (42sts total) 
Row 67: K41, Sl. st.

Divide For Top 
At this point you will work with first 21sts and leave the last 21sts to work with later. 
Row 68: SSK, K16, K2tog, Sl. St. (19sts total), slide next 21 sts to stitch holder to be worked later. 
Row 69: SSK, K14, K2tog, Sl. St. (17sts total) 
Row 70: SSK, K12, K2tog, Sl. St. (15sts total) 
Row 71: SSK, K10, K2tog, Sl. St. (13sts total) 
Row 72: SSK, K8, K2tog, Sl. St. (11sts total) 
Row 73: SSK, K6, K2tog, Sl. St. (9sts total) 
Row 74: SSK, K4, K2tog, Sl. St. (7sts total) 
Row 75: Bind off. Put sts from stitch holder on needle and reattach the yarn at the center of heart.
Rep rows 68-75 Finishing Weave in ends, wash and block to finished measurements


The Original Pattern can be found at http://www.knitpicks.com/patterns/Queen_of_Hearts_Dishcloth__D55808220.html

Thursday, February 9, 2017

Rocker for Skis and Snowboards Explained

What Is Rocker?
Before rocker there was (and still is) camber.
Camber describes the shape of a traditional ski. Place one on a flat surface. It will rest on points near its tip and tail while its waist (midsection) arcs upward. This built-in arch is the camber of the ski.
Camber puts springiness and pop into a ski. It permits easy handling, responsive turning, powerful carving, stability and, due to ample edge contact with the snow, good grip on icy slopes. It remains a popular choice when skiing groomed slopes or on hardpack snow. Alternate terms for camber include standard alpine and positive camber.
Rocker was introduced in 2002 when the late Shane McConkey introduced the first commercial rockered ski, the Volant Spatula. The concept: Create a downhill ski that mimics the attributes of a water ski, enabling a skier to skim over a surface with minimized risk of snagging an edge. It was originally envisioned as a powder ski.
Rocker is essentially the opposite of camber, thus is also known asreverse camber or negative camber. The side profile of a rockered ski resembles the upturned rails of an old-school rocking chair. On a flat surface, the midsection of a rockered ski will rest on the ground while its tips and tails rise off the ground much earlier than they do on a cambered ski.
So what’s the better choice—rocker or camber? It’s not an either/or proposition. Many skis today use both underfoot camber and tip and tail rocker in their designs.
What Does Rocker Do?
Rocker offers skiers several advantages:
  • Improved flotation in powder. Early-rising tips help you stay on top of soft snow and keep those shovels out of the powder.
  • Greater maneuverability. Fully rockered skis, made to stay afloat, have a shorter effective edge. Less edge contact with the snow permits easier initiation of turns. Rocker, one manufacturer’s rep tells us, pre-cocks the ski into the arc of the turn. This allows the sidecut of the ski to be engaged more smoothly and easily.
  • Enhanced park experience. Not all park skis are rockered, but those that are tend to make sliding rails and doing tricks easier. There’s less risk of catching an edge when landing a trick, too.
Skis –
Why Are There So Many Rocker Variations?
Ski manufacturers gradually realized rocker could be combined with camber to address specific performance needs. Soon companies began putting their own individual spin on rocker technology.
Having lots of rocker options is a good thing. But trying to digest a lot of techy names for rocker can be daunting. So as new variations of rocker and rocker-camber combos emerge each season, the following observations might be helpful:
  • Rocker can be located many places. It can be in the tip alone, in both the tip and the tail, or in the full length of the ski. Modified sidecuts (some wide, some not so wide) are often also part of a rockered ski’s design package. Any of these approaches may be marketed as rockered skis, or as hybrid skis, or by some other term. Confused? You are not alone.
  • Rocker may be referred to by many terms. Most popular are reverse camber and negative camber, as noted earlier, but also inverse camber or early rise.
How to match a rocker design with your usual ski and terrain preference:
All-mountain and all-mountain wide: A popular combination is a rockered tip (for easier turning and good flotation for skiing off-piste in powder), cambered or flat midsection (providing some edge control) and possibly a flat or low-rise tail (for skiers eager to hold speed). Such skis may be categorized as rockered or hybrid skis; keep in mind that ski makers often have different takes on essentially the same design.
Shop REI’s selection of all-mountain skis and all-mountain-wide skis.
Powder: This is what rockered skis were originally created to address. Though many models are cambered underfoot, their classic rockered tips and tails are best for taking on deep powder. Reverse sidecut at the tip (i.e., a narrower shovel) maneuvers more easily and is less likely to snag an edge. Such skis do a good job floating on the top layer of powder; they turn quickly (handy when in trees) and stop swiftly. Downside: Don’t count on them to hold an edge consistently.
Twin tip/park/pipe/freestyle: A rockered ski offers more contact space in the ski’s midsection so sliding rails is easier. It creates a more stable landing platform and reduces the chance of catching an edge, too.
How Do I Shop for Rockered Skis?
Since rocker specs and terminology vary by ski manufacturer and from model to model, it’s best to shop for skis based on the terrain you’ll be skiing. Your REI sales specialist can guide you to specific ski models.


Rocker for Snowboards Explained
Rocker technology offers a subtle but significant advancement in snowboard performance and riding comfort. Its popularity has generated lots and lots of rocker variations, though, and all the tech-sounding terminology associated with these different approaches can cause your head to spin. In a quest for simplicity, here is a basic explanation of what rocker is and how it works.
What Is Rocker?
First, the nontechnical story:
Rocker, at its essence, is a design technology intended to make snowboarding easier.
Snowboarders of all skill levels can benefit from rocker. Yet recreational riders, progressing riders and people who haven’t been on a board for years can enjoy an almost immediate boost from rocker’s performance attributes.
Rockered boards offer more flex than traditional snowboards and float easily in powder. Riders who are developing or rediscovering their skills quickly appreciate rocker’s forgiving nature.
Advanced riders? Rocker and its constantly evolving offspring (rocker-camber combos, hybrids and mash-ups of many past and present technologies) work for them, too. Designers, in mad-scientist sort of way, have concocted all types of nuanced rocker variations that address specific rider needs. Expert-level boarders can fine-tune their ride by seeking out the rocker mix that best suits their needs.
Now a look at rocker’s technical side:
Rocker is essentially the opposite of camber. In some circles you’ll hear rocker referred to as reverse camber, negative camber, alternate camber or mixed camber; camber is sometimes called positive camber.
For years snowboards used cambered designs exclusively, and cambered boards are still a popular choice. When placed on a flat surface, a cambered board has an uplifted waist (midsection) while its contract points rest on the ground near its tail and nose. The convex area where the board arcs upward by a few millimeters is known ascamber.
Camber puts springiness (or pop) into a snowboard and gives a rider good edge control. When a rider applies body weight and presses into the board, the camber flattens, creating continuous edge contact with the snow. This permits easy, confident, even aggressive turning.
Cambered boards are popular with riders who:
  • enjoy going fast
  • frequently ride groomed slopes
  • prefer a responsive, stable board that can handle hard snow

With rocker, a board’s nose and tail rise much earlier, and the board’s side profile reveals an upward arc, a shape that resembles the floor rails of a vintage rocking chair. (Hence the term “rocker.”) A board’s contact space is now directly below the rider, located close to the feet.
Rocker started to become popular in snowboards around 2005, and the design was fairly simple and straightforward—a balanced, continuous arc that curves up from the center of the board. With an early-rising nose and tail, rockered boards floated easily in deep powder.
What Does Rocker Do?
Rocker offers snowboarders several advantages:
  • Improved flotation in powder. An early-rising nose and tail help riders stay on top of soft snow.
  • Greater maneuverability. Fully rockered boards, made to stay afloat, have a shorter effective edge. Less edge contact with the snow permits easier, more nimble turning.
  • Enhanced park experience. Without all the spring that comes in a cambered board, it is often easier to slide rails on a rockered snowboard with more contact space in the board’s waist. The risk of catching edges is reduced as well. Rockered boards are nice for riding switch, too.
Why Do So Many Rocker Variations Exist?
Snowboard manufacturers soon realized rocker could be combined with camber or zero camber (meaning flat) to address specific performance needs. Companies began putting their own individual spin on rocker and inventing lots of tech-sounding terms for them. All the terminology can be a little daunting for shoppers.
Ultimately, having lots of options is actually a good thing. There are more than 100 variations of rocker, camber and flat design exist among manufacturers. Some points worth remembering:
  • Rocker can be located many places. It can be in the nose alone, in the tail alone or in both the nose and tail. Variations in a board’s waist measurement can also influence its performance. At REI, we tend to lump all the combinations into a broad category called mixed camber, though manufacturers may promote their particular design as rocker, hybrid, camber medley or something else entirely.
  • Rocker may be referred to by many terms. Most popular are reverse camber and negative camber, as noted earlier, but also inverse camber, alternate camber, modified rocker, early rise, banana or some other inventive phrasing. Just realize that some terms may be interpreted differently by different manufacturers. Consistent, universally recognized terminology is not a given.
Some thoughts on matching a rocker design with your usual terrain preference:
  • Groomed slopes: Cambered boards are popular here for their stability at speed and reliable edge control. Rockered boards perform well on resort slopes, too. They falter a bit when conditions are icy, when edge control becomes more important.
  • All-mountain: For riders who roam freely from groomers to sidecountry and backcountry, rockered boards are an excellent choice for their ability to turn easily and quickly. The extra float they provide in powder is one of their most popular advantages. Mixed cambered boards also are popular choices in varying conditions. Shop REI’s selection of all-mountain snowboards.
  • Powder: This is where rockered boards were originally designed to rule. Their early-rising noses and tails easily float in the soft stuff and are much less likely to catch an edge. Rockered boards also allow you to ride more centered over your bindings in deep snow, which greatly reduces back leg burn. Cambered boards can perform well in this terrain as well, though usually using a set-back stance.
  • Park/pipe: Many riders like the stability of cambered boards when executing jumps in parks. Rockered boards, meanwhile, simplify the task of transitioning from nose to tail. For jibbing, rockered boards are popular for avoiding hang-ups on boxes and rails. Pressing into a rail is much easier with rocker design. Shop REI’s selection of freestyle snowboards.
Cambered boards have been the staple in snowboard parks where most of the lines are jump lines and you need to get the most pop off the lip as possible. The camber design traditionally gives you more consistent pop off jumps.
In recent times, parks have changed to include more features such as rails and boxes. Most of the tricks performed on these features are press tricks, and they are easier on rockered boards because the boards are pre-pressed. You are also less likely to catch your edges on park features with this design.

Article and others like it found at REI.com

Monday, February 6, 2017

Free Pattern of the Week!

This weeks Free pattern is Sloped Lines Dishcloth from KnitPicks.Sloped Lines Dishcloth


Finished Measurements Approx. 7.5 x 7.5” square
HOOK G (4.0mm) crochet hook
Notions Yarn Needle Gauge 4.5 sts=1” in stitch pattern (gauge is not critical)

Notes: Spiked Crochet YO, insert hook into the same stitch that the first dc of previous 3 dc section was worked, YO, draw up loop loosely as to not crush 3 dc section, *YO, draw through 2 loops* twice
Directions Loosely chain 36 stitches.
Row 1: Skip 3 ch (counts as 1 dc), *1dc into each of next 3 ch, work 1 Spiked Crochet and then skip next ch* rep to end of row, work 1 dc into last ch, turn.

Row 2: ch 3 (counts as 1 dc), skip 1 st, *1 dc into each of next 3 sts, wok 1 Spiked Crochet and then skip next st* rep to end of row, work 1 dc into top of turning chain, turn.

Repeat Row 2 until dishcloth measures 7.5” long.

Finishing Weave in ends, wash and block to size.

The Original Pattern can be found at
http://www.knitpicks.com/patterns/Sloped_Lines_Dishcloth__D55553220.html

Thursday, February 2, 2017

How to De-Crap Your Home: A Start-to-Finish Guide

How to De-Crap Your Home: A Start-to-Finish Guide


While it's no epidemic, it's hard to argue that most of us have a little "too much stuff". Whether you've got a little or a lot more clutter than you'd like in your home, here's a start-to-finish look at how to streamline your Spring cleaning.
Getting rid of your stuff can be difficult. Things have value to you, whether you've formed a personal attachment to your stuff or you believe you'll have a practical use for it... someday. Most of the time, "personal value" means guilt and "someday" never comes.
We're not talking about going ultra-minimalist here, but rather making a concentrated effort to only keep the things in your life that you use and actually matter to you. To do this, we're first going to take a look at identifying the crap in your home, then how to get rid of it so you're not always just throwing it away, and finally discuss some methods for actually maintaining your crap-free lifestyle. Let's get to it.

Identify the Crap

Some crap is easy to identify, like a corporate t-shirt that's several sizes too big and you forgot about its existence, or that birthday card from 1994 that you're afraid your grandmother will ask about next time she visits. If you still have any of this kind of stuff, stop reading this post and go out into the yard and burn it. (Don't actually do this—it's illegal.) Now that you've gotten rid of your easily identifiable crap, we can start working on the rest—deciding what can stay and what can go.

Step 1: Sort It Out

First, you need to sort out your excess. Categorize the items you're sorting through so you can concentrate on each separately. These categories should include things like books, clothing, cables, and gadgets. They can even be more specific, if you have a hobby hording problem. For example, puzzles and board games, photo albums, and sports equipment are all examples of potentially less-common things that can easily build up in your home. If you notice anything taking up just a little too much space, it needs to be a category on your list.
With each category, sort every item into one of three piles: the stuff you're going to keep, the stuff you're going to get rid of, and the stuff you're not sure about. Be ruthless: When's the last time you used that bulky electric juicer? What are the chances you're going to start using it in the future? Is it really worth keeping around?
When you're done sorting, go through the pile of items you're not sure about and try to get rid of about half of it. One simple decision-making factor: find similar items and pick the one you like the best, get rid of the rest.
Now that you've made a mess of your home by tossing your stuff into piles on the floor, it's time to put it all back again. First put the stuff you're getting rid of in a cardboard box, trash bag, or whatever you prefer so long as it's clearly moving on to its next life. Next, put all the stuff you're keeping back where it belongs and admire all the new, empty space you've created. Last, grab all the things you're not sure about and put them somewhere separate. If you're hanging clothes, hang these items in another area of a closet or place them in a separate drawer. Do not keep them with the stuff you're sure you want to keep. Keep track of whether or not you use any of them over the next 30 days. If you do, you can put it back with the stuff you want to keep. If you don't, you're getting rid of it when the 30 days are up.

Step 2: Repeat Step One

No, not right away. You've just had to part with a bunch of things you think you care about, so you're clearly not in the emotional state to handle another tumultuous breakup with your possessions. Wait 30 days and repeat the process. After a month, when time has healed your wounds, you'll find it much easier to let go of even more things you don't need. You might even like it. It's nice having more space in your home, and once you realize 1) that you like it and 2) you don't miss anything you tossed, you'll have a much easier time getting rid of more things you don't need.

Step 3: Remove the One-Offs

By the time you've made it to this final step, you've probably gotten rid of most of your unnecessary crap. What's left are the things you don't have too much of but still find taking up unnecessary space in your home. Do you have an electric guitar you never play because you said you'd take lessons four years ago but never got around to it? Identify anything like that guitar and mark it for deletion. In the next section, we're going to look at the best options you have for actually getting rid of all the stuff you identified in these three steps.

Get Rid of the Crap

When you're getting rid of your things, you have a couple of options. Obviously you can throw things away, but if you have anything in good condition you can also sell it or donate it. Some specific items may also find a new life in the digital world, or you may have friends who want some of your things. In this section we're going to take a look at the best ways to finally let go.

Donate to the Needy (or Not-So-Needy)


Donating is the easiest way to throw your crap away without actually doing that. Finding your local Salvation Army or Goodwill is a fine way to start. Additionally, if there's a particular cause you're passionate about you can often find organizations that will take some of your things. A quick web search will usually turn up a few local options, so search for a cause if you want to help in a more-specific way.
If you just hate doing good and helping other people is too selfless, you can always win favor with your friends by giving them your potentially useful-to-them crap. Every friend wants to get a call asking them if they want an old pair of gym shorts or your extra copy of Serial Mom on DVD. Sometimes you will have some things your friends can benefit from, so don't hesitate to set them aside to ask. If they don't want them, you can always just suck it up, be a good person, and donate to someone in need who has yet to experience Serial Mom while wearing your old gym shorts.

Sell, Sell, Sell

If you're going to sell your stuff, the most obvious option is to use Craigslist and/or eBay. You'll want to use Craigslist for things like furniture or larger items you won't want to ship. You may also prefer to sell your gadgets and other technology there as well, especially if you don't have the box. eBay is always an option, but it's not as good of market as it once was for this kind of sell-off.
In addition to the obvious, you have Amazon and Gazelle for certain items in your inventory. First, Amazon will buy your old electronics for money to spend at Amazon. Additionally, a service called Fulfilled by Amazon can make the process of selling through the retail giant much less work. Fulfilled by Amazon is a service that lets you drop ship your stuff to Amazon, who then lists it on their product pages, ships out the items for you just like the item was purchased from them directly, and deposits the money from the sale in your checking account (after taking their commission, of course). You still have to add all the items to your inventory yourself, but if you're getting rid of a lot of stuff this is a huge time-saver and doesn't cost much more than if you did all the hard work. While you won't be able to get rid of everything this way, as the sock puppet you made in 2nd grade isn't a currently listed product, you can sell quite a few of your possessions and make a fair amount of pocket change in the process.
If you want to do even less work, and you have a lot of technology to get rid of,Gazelle is a good option. Because their site is geared towards selling your gear, it's very easy to search for what you want to get rid of, specify the condition, and get a quick quote. It's also pretty easy to find a Gazelle coupon that will get you an extra 5%. If you're really lazy, Gazelle will send you a box and pick it up so you can continue your life in solitude with minimal interruption.
Amazon and Gazelle are both great options if you want to save yourself some time, but if you want to put in the effort to make as much money as possible then be sure to read our guide to selling your gadgets for more tips.
A lot of the crap you have in your home can fit on a hard drive if you're willing to put in the effort (or pay someone to put in said effort for you). If you have old items you want to keep but would be willing to toss if you had a digital version, you should read out guide on digitzing your life. Nothing saves space like getting rid of stacks of photos, old VHS tapes, and other stuff with your worst enemy: sentimental value.
This is really easy, because you may already have it in a trash bag. Take that bag to the curb, toss it in a nearby dumpster, or just feed it to the monster that lives under you bed. Actually, throwing things away is not always so easy if you want to do it as safely as possible. Your technology, for example, doesn't sit so well when buried in the planet. If it's something you can recycle, take the effort to recycle it. Or don't. Sites like Gazelle will take your dead technology off your hands, and you can find recycling centers at both the EPA and Earth911.

Maintain Your Crap-Free Existence

Congratulations. If you've made it here, your home is crap free. If you just skipped to this section without doing anything, that congratulations is rescinded—but your curiosity is commendable. It's a huge accomplishment to de-crapify your entire home, but all that effort is wasted if you can't maintain a crap-free lifestyle. For that, you need some rules, policies, and tricks to ward off the excess stuff that once plagued your life.
You may have heard that you should toss it if you haven't used it in the last year. This is true, but that's a very reasonable attitude to take with your stuff. If you have a tendency to keep things you don't need, you need policies a bit more strict and timely than that. Live by these instead:
  • When you get something new, you have to get rid of something old. It doesn't have to be the same type of item, but it should take up approximately the same amount of space (or more).
  • Set an expiration date on anything you notice you haven't used in awhile. So you remember, set a reminder on your calendar or put a post-it note on that item with an expiration date. If you see it again and that date has passed, it's time to let it go.
  • Don't buy anything new until you've considered whether or not you need it for 48 hours. (Obvious exceptions include more urgent things like broccoli, hemorrhoid cream, and tickets to the midnight screening of the next big disappointing comic book film.)
  • Get organized in ways that help you better use everything you still have. Organize your clothing by color, like in a clothing store, so it's easy to find what you're looking for. You get the idea.
Cleaning can be hard when it means getting rid of things you've come to love over the years, but chances are you'll come to love the extra space even more. Hopefully this guide will help you get your crap under control and out of your home. If you have any great de-crap suggestions of your home, be sure to share them in the comments.