Monday, November 28, 2016

Free Pattern of the Week!

This weeks Free pattern is Arc En Ciel Dishcloth from KnitPicks.


Finished Measurements Approximately 10” Square
Needles US 5 (3.75mm) straight or circular needles, or size to obtain gauge
Notions Yarn Needle
Gauge 20 sts and 32 rows = 4” in St st

Notes: Arc en Ciel is a simple but cheery rainbow dishcloth with a variation on the Bargello stitch between each color and a garter stitch border. This happy dishcloth will make doing the dishes so much more fun. This pattern can also be made from just 2 or 3 colors to match your kitchen! 

Directions 
CO 51 stitches using C1 

Rows 1-8: C1: Knit 

Row 9 (RS): switch to color C2: Knit 

Row 10 (WS): K5, P to last 5 sts, K5 

Row 11: K 

Row 12: K5, P to the last 5 sts, K5 

Rows 13 -16: repeat rows 11 & 12 

Row 17: (RS) switch to color C3: K5 *K1, slip next 3 sts purlwise with yarn in back; repeat from * across to 6 st before the end, K6 

Row 18: (WS) K5, P1, *p1, slip next st with yarn in front, p2; repeat from * to 5 st from the end, K5 

Rows 19-24: repeat rows 11 & 12 

Row 25: switch to color C4: K5 *K1, slip next 3 sts purlwise with yarn in back; repeat from * across to 6 st before the end, K6 

Row 26: K5, P1, *p1, slip next st with yarn in front, p2; repeat from * to 5 st from the end, K5 

Row 27-32: repeat rows 11 & 12 

Row 33: switch to color C5: K5 *K1, slip next 3 sts purlwise with yarn in back; repeat from * across to 6 st before the end, K6 

Row 34: K5, P1, *p1, slip next st with yarn in front, p2; repeat from * to 5 st from the end, K5 

Row 35-40: repeat rows 11 & 12 

Row 41: switch to color C6: K5 *K1, slip next 3 sts purlwise with yarn in back; repeat from * across to 6 st before the end, K6 

Row 42: K5, P1, *p1, slip next st with yarn in front, p2; repeat from * to 5 st from the end, K5 

Row 43-48: repeat rows 11 & 12 

Row 49: switch to color C7: K5 *K1, slip next 3 sts purlwise with yarn in back; repeat from * across to 6 st before the end, K6 

Row 50: K5, P1, *p1, slip next st with yarn in front, p2; repeat from * to 5 st from the end, K5 

Row 51-56: repeat rows 11 & 12 

Row 57: switch to color C8: K5 *K1, slip next 3 sts purlwise with yarn in back; repeat from * across to 6 st before the end, K6 

Row 58: K5, P1, *p1, slip next st with yarn in front, p2; repeat from * to 5 st from the end, K5 

Rows 59-64: repeat rows 11 & 12 

Row: 65: switch to color C9, knit all stitches 

Row 66-72: knit all stitches BO all stitches 

Finishing Weave in ends, block if desired. 


The Original Pattern can be found at http://www.knitpicks.com/patterns/Arc_en_Ciel_Dishcloth__D55546220.html

Thursday, November 24, 2016

KOOL-AID Play Dough

Need the kids to be entertained this holiday season? This is an easy and fun holiday craft for all.
kool-aid-play-dough-148569 Image 1
Prep Time 15min.      Total Time 30min.
Ingredients
·       1 cup flour
·       1/2 cup salt
·       1 env. (0.13 oz. to 0.23 oz.) KOOL-AID Unsweetened Drink Mix, any flavor
·       2 tsp. cream of tartar
·       1 cup water
·       1 Tbsp. oil
Directions
·       Mix first 4 ingredients in medium saucepan until blended. Stir in water and oil.
·       Cook on medium heat 5 min. or until mixture forms ball, stirring frequently.
·       Transfer to plate; cool slightly.
Storage Know-How - Store in resealable plastic bag or airtight container.
Important Note - KOOL-AID Play Dough is not intended for consumption.


Original Recipie is located at 
http://www.kraftrecipes.com/recipes/kool-aid-play-dough-148569.aspx

Monday, November 21, 2016

Free pattern of the Week

This weeks Free pattern is Double V Dishcloth from KnitPicks.


Needle US 5 (3.75 mm) 16” circular or straight needle.
NOTIONS Yarn Needle
Gauge 17 sts x 28 rows = 4” in stockinette.
Finished size 7” square

Double V Dishcloth Notes:

A section of extra long slip stitches in the center give you extra scrubbing power, perfect for tackling stubborn dishes or deep exfoliation.

Long Tail Cast On instruction can be found here: http://tutorials.knitpicks.com/wptutorials/long-tail-cast-on/

DWS (Double Wrap Stitch): work as a knit stitch with the yarn wrapped twice around the right hand needle before pulling it through the stitch on the left hand needle as for a regular knit stitch. One of each double loop will be slipped off the needle in the second round to create an extra tall stitch.


Directions
CO 32 sts using a long tail cast on.
Row 1-7: garter stitch
Row 8 (WS): K4, pm, P to last 4 sts, pm, K4.
Row 9 (RS): K4, sm, K across, sm, K4.
Row 10 (WS): K4, pm, P to last 4 sts, pm, K4.

Slip Stitch Section:
Row 1 (RS): K4, sm, K1, *DWS, K3* repeat from ** to end, ending with K2, sm, K4.
Row 2 (WS): K4, P2, *SL (dropping one wrap off needle), P3* repeat from ** to end, ending with P1, sm, K4.
Row 3 (RS): K4, sm, K1, *SL, K3* repeat from ** to end, ending with K2, sm, K4.
Row 4 (WS): K4, P2, *SL, P3* repeat from ** to end, ending with P1, sm, K4.
Row 5 (RS): K4, sm, K3, *DWS, K3* repeat from ** to end, ending with DWS, sm, K4.
Row 6 (WS): K4, *SL (dropping one wrap off needle), P3* repeat from ** to end, sm, K4.
Row 7 (RS): K4, sm, K3, *SL, K3* repeat from ** to end, ending with SL, sm, K4.
Row 8 (WS): K4, *SL, P3* repeat from ** to end, sm, K4.

Repeat rows 1-8 three more times.

Row 1 (RS): K4, sm, K across, sm, K4
Row 2 (WS): K4, sm, P across, sm, K4
Repeat rows 1-2 once more.

Work 7 rows garter stitch then BO all stitches.

Finishing Weave in all ends and block to measurements.


The Original Pattern can be found at http://www.knitpicks.com/patterns/Double_V_Dishcloth__D55576220.html

Thursday, November 17, 2016

Sleeping Bag Care On the Trail

Sleeping Bag Care On the Trail

Being an Outdoor Guide means that everyone asks you how to fix their stuff. Here are some tips and tricks that you can use!


Keep your sleeping bag clean and dry. Accumulated body oils, sweat and dirt can rob your sleeping bag of its insulating power. Tips:
  • Sleep in clean clothes. Best is long underwear, socks and a hat. If it's warm out, wear clean cotton clothes to bed. Just don't fall into bed in the same clothes you hiked in. You'll drag dirt into the bag with you, and you're likely to sleep colder because of accumulated perspiration.
  • Avoiding sleeping in the clothes you cooked and ate in—especially if you're in bear country.
  • Consider using a sleeping bag liner. Liners weigh little and keep your bag clean. Plus, they add about 5° F to 15° F to your bag's temperature rating. At the end of each trip, wash the liner and you're good to go again.
  • Air out your sleeping bag daily. Even if you have to wait till midday to do so, turn it inside-out to dry out any moisture. Don't leave a bag in direct sunlight for very long, as UV light slowly degrades the fabric. But if your bag gets really wet, it may be necessary to air it out for several hours.
Tips for using a stuff sack:
  • Use a larger stuff sack to make stuffing easier. You can still pack around the stuff sack inside your backpack.
  • Compression stuff sacks save space in your pack; just avoid compressing your bag for an extended period as it will reduce the bag's loft.
  • For easier stuffing, start with the foot first and the zipper at least partially closed. Push the bag firmly into the bottom of the stuff sack and stuff evenly as you go up. This also puts even stress on the stitching.
  • Wet weather? Line a nylon stuff sack with a plastic garbage bag and then stuff the sleeping bag in it. Or use a waterproof stuff sack.
Article and others like it found at REI.com

Monday, November 14, 2016

Free Pattern of the Week

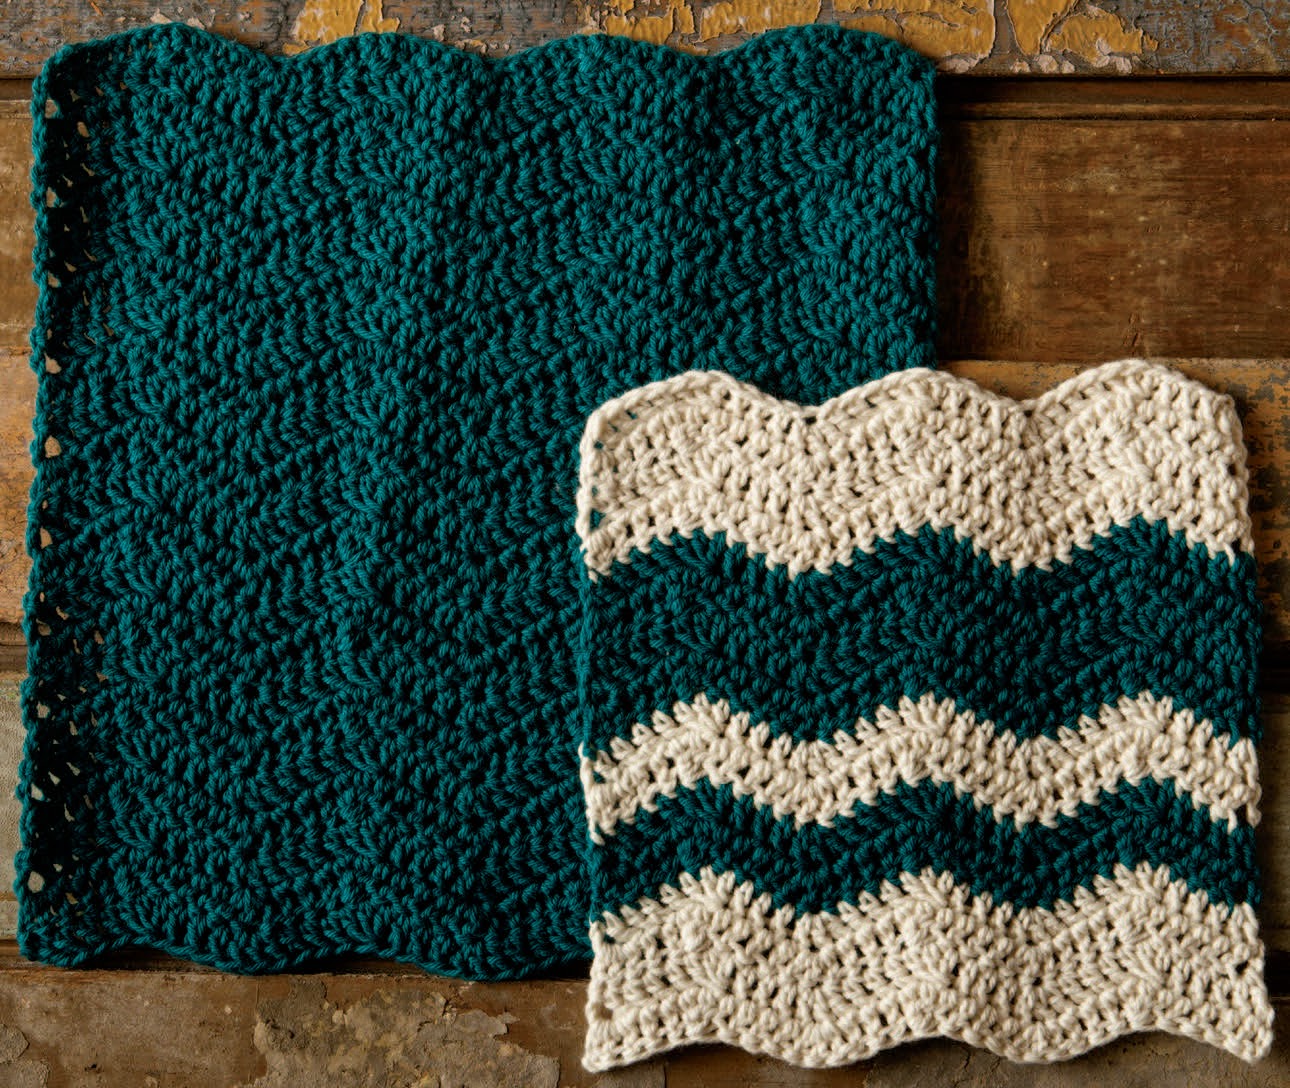
This weeks Free pattern is Wavy Chevron Dishcloth from KnitPicks.


FINISHED MEASUREMENTS Approx. 8.5 (11.5)” square
HOOKS G (4.0mm) crochet hook
NOTIONS Yarn Needle
GAUGE 10 sts = 2.75” in chevron pattern, unblocked
Notes:
dc3tog (double crochet 3 stitches together)
*yo, insert hook into next stitch, yo and draw up a loop, yo and pull through two loops* three times total. There will be 4 loops on your hook, yo and pull through all loops. 2 stitches decreased. Stripe Sequence (for small dishcloth) Row 1-4: swan Row 5-8: kenai Row 9-10: swan Row 11-12: kenai Row 13-16: swan

DIRECTIONS
Loosely ch (33) 43 stitches.
If making the smaller dishcloth, follow stripe sequence as described above in the pattern notes.

Row 1: skip 2 ch and work 1 dc into 3rd chain from hook, *1 dc into next 3 ch each, 1 dc3tog over next 3 ch sts, 1 dc into next 3 ch each, work 3 dc into next ch* ending the last repeat by working 2 dc into last ch instead of 3. Turn.

Row 2: ch 3 and work 1 dc into first st, *1 dc into next 3 ch each, 1 dc3tog over next 3 ch sts, 1 dc into next 3 ch each, work 3 dc into next ch* ending the last repeat by working 2 dc into into top of turning chain instead of 3. Turn.

Repeat only Row 2 for 14 (20) more rows or until dishcloth measures 8.5 (11.5)” long.

Finishing Weave in ends, wash and block to size

The Original Pattern can be found at http://www.knitpicks.com/patterns/Wavy_Chevron_Crochet_Dishcloth__D55545220.html

Thursday, November 10, 2016

Ski Vocabulary

Hello Everyone!

The first snow has fallen at my house and I'm just too excited for winter. Especially Skiing!

Last year I taught a little 6 year old girl how to ski and she was fantastic! I made her flash cards that helped keep her occupied on the drive to and from the mountain.


Below are the vocabulary words that helped her fully understand skiing. Please understand that some of these are simplified so that a 6 year old could understand.

Types of Skis and Their Parts
Nordic / Telemark - Free-Heel Skiing; Type of Skiing using a binding that attaches the ski to the boot only at the toe
Snowblading - Kind of skiing that uses very short skis and no poles
Cross-Country - Skiing on very flat ground with very long skis, usually for long distances
Heli-Skiing - Type of skiing where skiers are dropped off at the top of an empty slope be Helicopter
Mono-Ski - A widened ski where both feet are fastened together facing in the direction of travel
Ski Jumping - Long, wide skis built to fly; Are shaped to create  cushion of air underneath the jumper
Tips - Front part of the ski
Inside Edge - Edge of the ski that points uphill or is on the inside of the turn
Edge - Metal strip that runs down each side of a ski; It allows skis to grip the snow during turns
Tails - Back part of the skis
Binding - The device that attaches your ski boot to your ski

Rules
Right of Way - The downhill skier has the Right of Way
Signs - Obey all signs and markings
Climbing - Always keep to the side of the run when climbing
Assistance - In an accident, offer help & alert the rescue service
Stopping - Only stop on the edge of the run or where you can be seen
Respect - Do not endanger others; Only ride on runs that you can cope with
Entering & Starting - Look up & down the mountain each time before entering a run
Control - Yourself; Your equipment
Overtaking - Leave plenty of space between you and the slower skier

Progression Moves
Side Stepping - walking up sideways up a hill with skis on
Snowplow - Pizza / Stop / Slow down; The tips are close together (but not touching) and the tails are far apart
Parallel Skiing - French Fry; A technique where you ski with the tips and tails are equal distance apart
Carving - Digging the edges of your skis into the snow so they son't slip sideways
Traversing - Skiing across a slope instead of down it; Zig-Zag
Neutral Stance - Basic position for every skier; Stand evenly on your skis without putting extra weight on any part of your boot or skis

Competition and Park - 
Slalom - Event where gates are set closest together. Racers have to combine speed with skill to weave in and out of the gates down the slope
Biathlon - An event that combines cross-country racing with target shooting
Downhill - Fastest & most dangerous of the ski racing events; Also known as Alpine ski racing; Some racers exceed speed of 81 mph
Ski Jumping - Skiers launch themselves from specially built ramps to see who can travel farthest through the air; Some jumpers can cover over 325ft before landing
Cross Country - Long distance ski races normally over flatter ground
Giant Slalom - A cross between a downhill race and a slalom race
Park - Designated area specifically for freestyle, jumps & features
Half-Pipe - A U-Shaped jump of which both side walls are used to project the skier into the air
Hit - A raised area of snow used to jump off
Rail - A metal or plastic rail for skiers to slide along
Mogul - A mound of snow

Other
Fresh Groomed Snow - Snow that has been groomed by a piste basher
Slush - Partially melted snow or ice
Powder - Loose, usually fresh snow that is not granular, wet or packed
Resort - A place where people come to ski; they tend to have lifts, restaurants and other facilities
Icy Snow - Hard snow that has frozen solid, Very slippery
Trail - Run; Marker route down the mountain for skiers
Green Circle - Beginner level run
Types of lifts - Chair Lift; Magic; Cable Cars; Drag Lift
Blue Square - Beginner / Intermediate level run
Black Diamond - Intermediate / Advanced level run
Double Black Diamond - Advanced level run
Hypothermia - Condition of having an unusually low body temperature (Below 95*)
Avalanche - Sudden movement of snow down a mountainside
Carbohydrate - Food that the body uses for energy
Crevasses - Deep cracks in ice or rocks
Fall Line -  The direction that a rock would travel if you rolled it down a slope; Usually straight downhill


If you have any additions please feel free to comment and add them!

Thanks,
Kim

Monday, November 7, 2016

Free Pattern of the Week

This weeks Free pattern is Ziggy Lace Scarf from KnitPicks.


Ziggy Lace Scarf Materials used: size H hook, approximately 440 yds. 
Finished size: approximately 4 1/2″ x 57″.

Row 1) 2 dc in 4th ch from the hook, ch 1, sk 2 ch, sc in next ch, (ch 2, sk 2 ch, 3 dc in next ch, ch 1, sk 2 chs, sc in next ch) 3 times, ending with sc in last ch. Ch 3, turn. 

Row 2) 2 dc in same st as turning ch, ch 1, sk 2 dc, sc in next dc, (ch 2, 3 dc in next sc, ch 2, sk 2 dc, sc in next dc) 3 times, ending with sc in top of turning ch. Ch 3, turn. 

Row 3) 2 dc in same stitch as turning ch, ch 1, sk 2 dc, sc in next dc, (ch 2, 3 dc in next sc, ch 1, sk 2 dc, sc in next dc) 3 times, ending with sc in top of turning ch. 

Repeat rows 2 and 3 to desired length. 


The Original Pattern can be found at http://www.knitpicks.com/patterns/Ziggy_Crochet_Scarf_Pattern__D50861220.html

© 2010 Paula Fisher http://hookandyarn.wordpress.com/free-patterns/ On Ravelry: Hookandyarn

Thursday, November 3, 2016

Tent Care at Home

Tent Care at Home


Being an Outdoor Guide means that everyone asks you how to fix their stuff. Here are some tips and tricks that you can use!


Tip #1: Got a new tent? Set it up at home first before going to a campground or into the backcountry. This lets you become acquainted with its assembly process in a no-pressure setting and confirms that you have all of your tent's stakes, guylines and accessories.
Tip #2: When you store a tent, make sure it is dry. No tent-care rule is more important. Wet tents, or even damp ones, invite mildew. After a trip, unpack your tent and inspect it carefully. If you detect even a trace of moisture, set it up in a shady spot (a garage, for instance) and let it air dry. If you have the space, store it loosely outside of its stuff sack. Avoid storing a tent in damp basements or hot attics.
Tip #3: To clean a tent, use a non-abrasive sponge, cold water and a non-detergent soap. Gently scrub soiled areas by hand. Avoid household cleaners such as dishwashing liquid, bleach, spot removers or laundry presoaking products. (Why? Virtually all household soaps are perfumed and will attract bugs, mice and other critters. These soaps also mask a tent's durable water repellent [DWR] coating.) Rinse thoroughly, then set it up in a shady spot and let it air dry completely.
Tip #4: Do not machine-wash a tent. If placed in a traditional top-loading washing machine, the back-and-forth churning of a washer's central-axis agitator could snag the tent and overstretch it or even pull apart its seams. In a front loader, repeated tossing and tumbling can wear off waterproof coatings. Machine-drying a tent is never an option; too much heat could cause the material to distort or melt.
Seams and Waterproofing
The floors and rainflys of nearly every tent come with factory-sealed seams. Seam tape is used to plug the tiny holes created by sewing needles when fabric sections are stitched together. One exception: ultralight tents that use silicone-treated nylon rainflys. Why? Seam tape does not bond to silicone.
Considerations:
  • Any tent that is not factory-sealed must be sealed manually using seam sealer, a liquid or glue-like product with a built-in applicator. Follow directions on the product. Seal seams at home prior to camping in the tent. Typically, seam sealer should be applied to the coated (shiny) side of the floor or rainfly. Seam sealer can also be used to plug seam leaks on a heavily used tent.
  • Well-worn tents (and single-wall tents) may also need to have the waterproof coating of their floors or rainflys rejuvenated. The latter becomes apparent when you notice your tent rainfly or walls increasingly sagging due to rain or dew. Wash-in or spray-on products used to revive waterproof/breathable outerwear can be used for tents, too.
Removing Mildew
Mildew can develop any time your tent is stored wet. It looks bad, smells bad and can damage your tent's waterproof coatings. Don't let it start.
Alas, if it already exists, here's what to do:
  • Try some light scrubbing with a sponge.
  • If mildew is still apparent, mix 1 oz. of MiraZyme® (or similar product) to 20 gallons of water in a bathtub and dip the whole tent. (Note: Lysol® also works, but its scent is attractive to bugs and critters and is thus not recommended).
  • For spot treatment, use 0.5 oz. of MiraZyme (or similar product) per 1 gallon of water and thoroughly scrub afflicted areas by sponge.
  • Set up the tent in a shaded spot and allow it to air dry.
  • Then, mix 1 cup of salt and 1 cup of concentrated lemon juice with 1 gallon of hot water. Rub solution into the visible mildew and, again, allow the tent to dry.
This procedure will stop mildew growth and eliminate the odor (including food odors), but it will never remove the stain.
Article and others like it found at REI.com